Cutting out
Step 1
Cut each of the green and cream fabrics into four x 2½in squares.
Step 2
Cut each of the backing fabrics into two x 2½in squares.
Step 3
From the felt cut one x piece 3in x 7in and one x piece 4½in x 8½in.
Making the needle book
Step 1
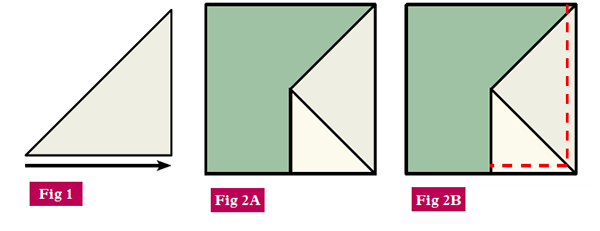
Press each of the cream 2½in squares in half diagonally, wrong sides together. With the 90-degree corner bottom right, fold the bottom left point over to the right-angled corner and press (Fig 1). Repeat for all four squares.
Step 2
Place each folded square on top of a green 2½in square, so the 90 degree corner is aligned with the bottom right corner (Fig 2A). Stitch in place with a small seam, ⅛in or less (Fig 2B).

Step 3
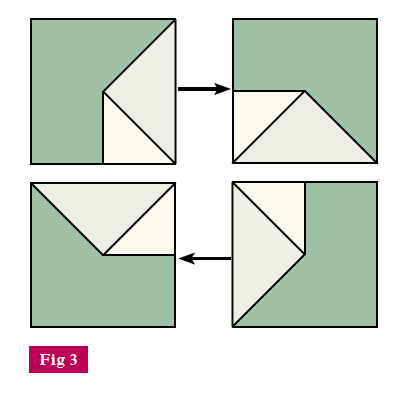
Stitch the squares together into pairs. Then stitch the pairs into a four-patch. Make sure all the points of the pinwheel are facing in the directions depicted in Fig 3.

Step 4
Stitch the four backing squares together into a four patch.
Step 5
Optional – Make a bookmark with embroidery floss, by tying it into a tassel on a plaited string.
Step 6
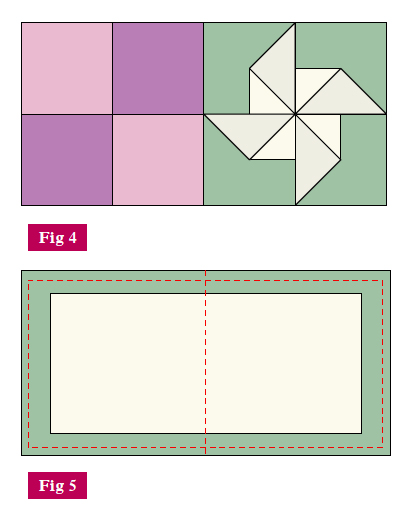
Attach the front to the back along one edge (Fig 4). Press seam open.

Step 7
Place the needle book exterior and lining piece right sides together. Sandwich the bookmark between them aligned with the centre seam. Place the 4½in x 8½in piece of felt on top. Stitch all around the edge with a ¼in seam leaving a gap for turning along the bottom long edge.
Step 8
Clip the corners and turn the right way out through the hole. Push out the corners with a blunt pencil or similar. Press really well all over, folding in the seams at the gap.
Step 9
Top stitch all around the edge of the needle book approximately ¹/₁₆in – ⅛in from the edge.
Finishing touches
Step 1
Embellish the 3in x 7in piece of felt if you wish. We added fabric scraps, a ribbon trim and buttons. Fold in half to mark a crease in the centre. Press the needle book in half to mark a crease in the centre of that.
Step 2
Line up the centre of the felt with the centre of the needle book exterior and stitch along this line (Fig 5). Press the whole thing in half to finish and add a snap fastener if desired.


