How to make sewing patterns

How to make sewing patterns

Making your own clothes can seem daunting, but it's easier than you might think. Learn how to make sewing patterns with Roisin McKenna's expert advice!

6 issues of Simply Sewing magazine for £14.99|Save 78%!

iStock/jacoblund

Published: March 30, 2022 at 7:39 am

Designing a pattern of your own if something most sewists aspire to. We might have grand ideas in our heads of all of the wonderful designs we could conjure up if we had the know-how, but drafting a basic patterns isn’t as scary a task as it may seem.

With the Great British Sewing Bee fast approaching, we thought we’d give you a head start so that you can get sewing and designing along with the contestants. If you’re a seasoned sewist or a complete novice, drafting a skirt pattern is a simple and effective way to learn about patterns and the process that goes into creating them.

Understanding why we add different seam allowances and the maths that goes into the drafting process will in turn give you a better understanding of how garments are constructed.

In this simple guide we’ll walk you through the measurements you’ll need to take, the tools you’ll need to draft a pattern and the drafting process itself. We’ll start with a simple circle skirt and then show you how to create a half circle skirt and a panelled skirt to extend your skills.

Simple, easy-to-follow line drawings are provided throughout to guide you through the process. So if you’ve got ideas for a floaty cotton summer skirt, a jewel-toned velvet skirt for the holidays or an upcycled denim panel skirt then we’ve got everything you need to get started below.

Before you begin there are a few basic tools that you will need. Most drafting guides will require fancy tools to get up and running, but in the interest of using what you have around the house, we’ve put together a “you will need” list that explains what you really need and how to incorporate household basics such as cans of beans and wrapping paper if need be!

Featured image by iStock/jacoblund.

You will need

  • Rulers – specialist curves are ideal but a straight ruler will do the job!
  • Pattern paper – a translucent paper such as tracing paper, thin pattern paper or baking paper works well. Newspaper can be used in a pinch, but beware that newspaper ink can transfer to your fabric! This could be a great way to recycle any large pieces of wrapping paper!
  • String – We will use string and a pencil to draw a nice smooth curve in the following examples. Simply tie the string to your pencil (near the tip) and knot securely). Hold the end of the string at the centre point of the curve and draw a smooth curve. You may need to go in afterwards and neaten any wobbly parts of the line up but this is a much more accurate method that drawing a curve by hand.
  • Pattern weights – these are useful to stop your paper moving while you are working. If you don’t have special weights for this purpose you can use tins.
  • Mechanical pencils – use a mechanical pencil to draft your patterns. The fine lead will lead to a much sharper line than a regular pencil – if your line is a few mm wide then you can throw the whole pattern off by quite a lot if you’re accidentally adding to or subtracting from each seam.
  • Calico fabric – or any other inexpensive fabric that is a similar weight to your chosen fabric. Old bedsheets or linens can be used and can be cut up time and time again for future toiles.
  • Fineliner – like mechanical pencils it’s important to use a pen with a fine nib for drafting patterns or you could inadvertently add to the pattern sizing!
  • An eraser – to rub out any mistakes.

Taking your measurements

Before starting, you will need to take your waist measurement, hip measurement and desired on the desired length of your skirt (although the length can be altered once the pattern is complete if desired. If you are able to do so, take your measurements standing up. For wheelchair or other mobility aid users, take your measurements in the position you are likely to be in most of the time.

Ask a friend to help ensure the tape measure is parallel to the ground while taking your measurements or look in the mirror to determine this yourself. Don’t pull the tape measure as tight as possible – you need it to be against your skin but still be able to fit two fingers under the tape.

Extra ease will be added as we draft the pattern, so you don’t need to increase your measurements as this stage. Write your measurements down and keep them in front of you during the process.

Read on to learn how to make sewing patterns and discover three ways to make a skirt pattern…

New to sewing? We've got lots of sewing guides and tutorials to help you get started. Take a look at our how to use a sewing machine and sewing for beginners guides. Stock up on supplies with our best sewing machines for beginners and sewing kits for beginners recommendations.
You will need:

  • Rulers
  • Pattern paper
  • String
  • Pattern weights
  • Mechanical pencils
  • Calico fabric
  • Fineliner pen
  • Eraser

Drafting the circle skirt pattern

Step 1

You can use a mechanical pencil to draft the entire pattern but if you are drawing lots of lines you may wish to use coloured fineliners to distinguish between the lines. Decide on your desired skirt length and make a note of this number.

Step 2

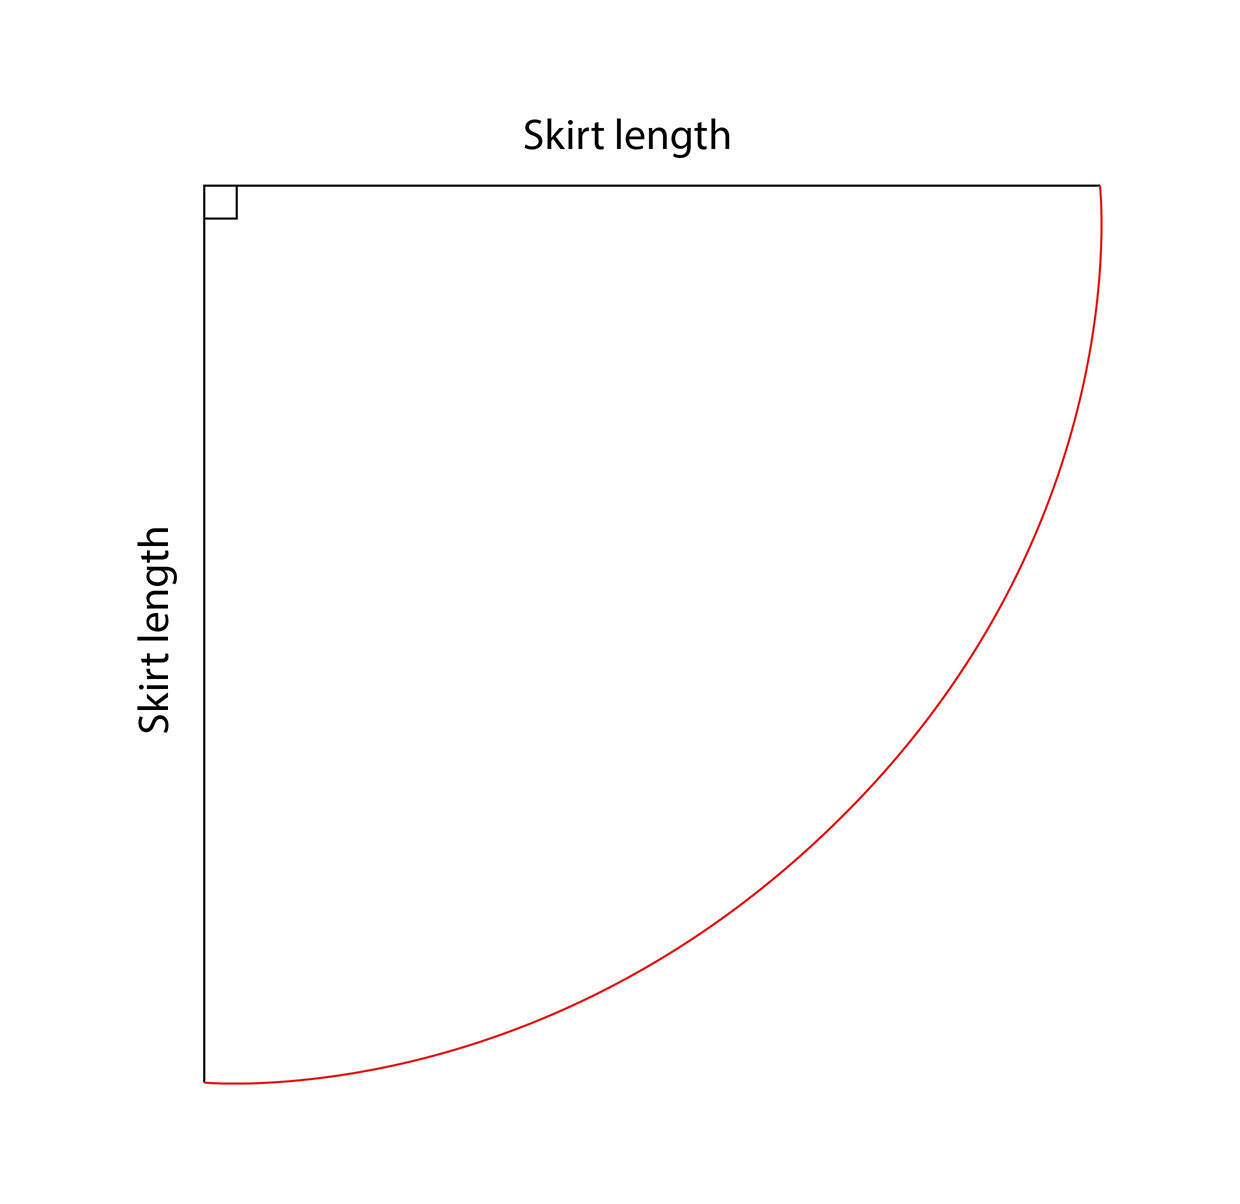
Draw a line on your paper that equals your desired skirt length.

Step 3

At a 90 degree angle from the beginning of this line, draw a line the same length.

Step 4

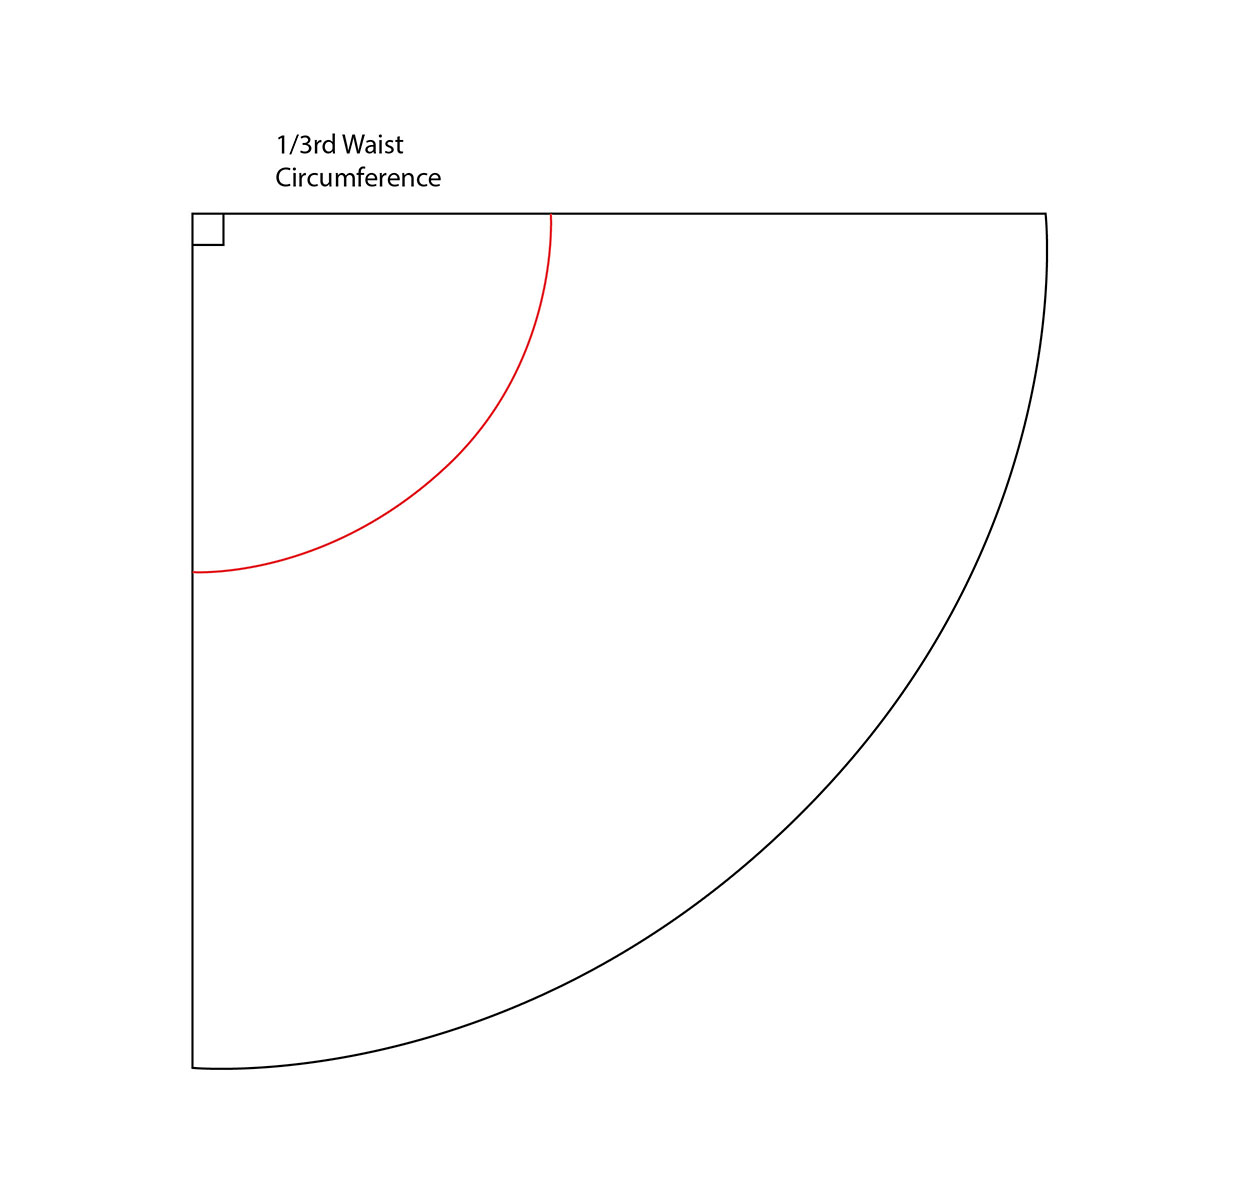
Tie a long piece of string to your mechanical pencil and knot securely. Move the string towards the tip of the pencil. Hold the other end of the string at the point where the two lines meet and place the pencil at the end of one of the lines. Holding the pencil upright and steady, trace a curve from one line end to the other, this will create the curved hem for your skirt.

Drafting a skirt step 1

Step 5

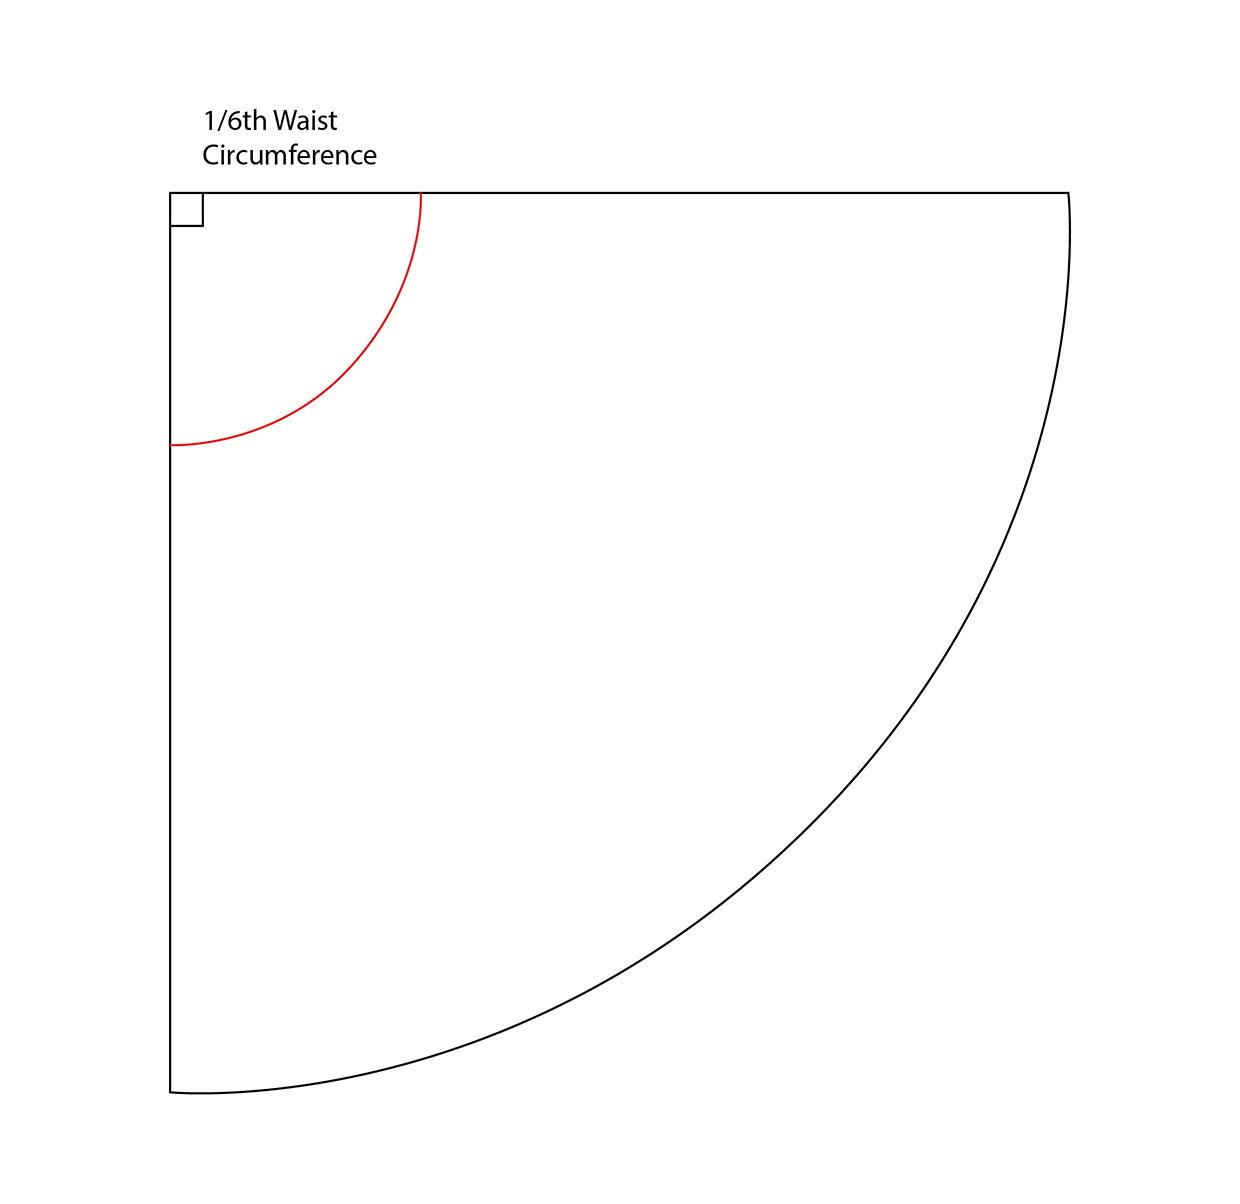
Take your waist measurement and divide it by 6.

Step 6

At the corner where your lines meet measure in by 16th of your waist measurement and make a mark. Repeat on the other perpendicular line to mark.

Step 7

As before, use the string method to connect the two marks, creating a smooth curve.

Drafting a skirt step 2

Step 8

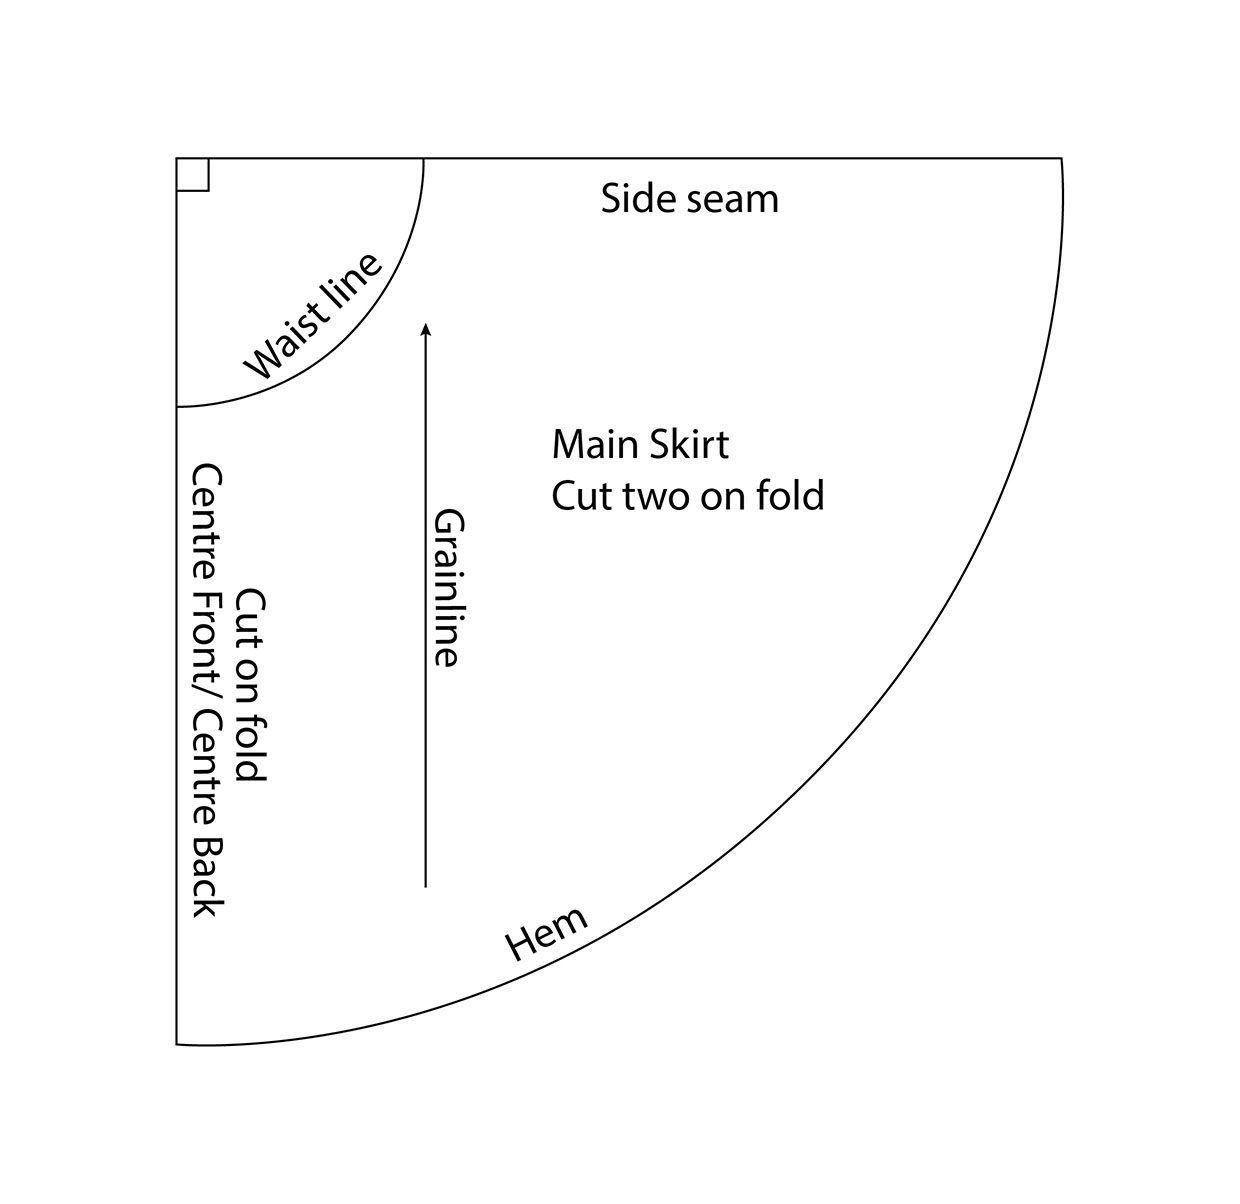
Trace off the pattern so you have a clean copy without the initial skirt length markings. Add your desired seam allowance to all edges, typically this is 1.5cm in dressmaking, but you can add 2cm at the hem if you’d like to finish the hem with a double fold hem.

Step 9

Label your pattern piece: ‘Main Skirt, cut two on fold’. Along one of the straight edges write, ‘Centre Front and Centre Back, place on fold’. Along the other perpendicular line write ‘Side Seam’. The grainline should be drawn parallel to the Centre Front/Centre Back line.

Drafting a skirt step 3


Drafting the pattern – half circle skirt

Step 1

You can use a mechanical pencil to draft the entire pattern but if you are drawing lots of lines you may wish to use coloured fineliners to distinguish between the lines. Draft a half circle skirt in the same way as a full circle skirt but this time the waistline marks equal 13rd of your waist measurement. Connect the lines using the string method as above.

Drafting a skirt step 4

Step 2

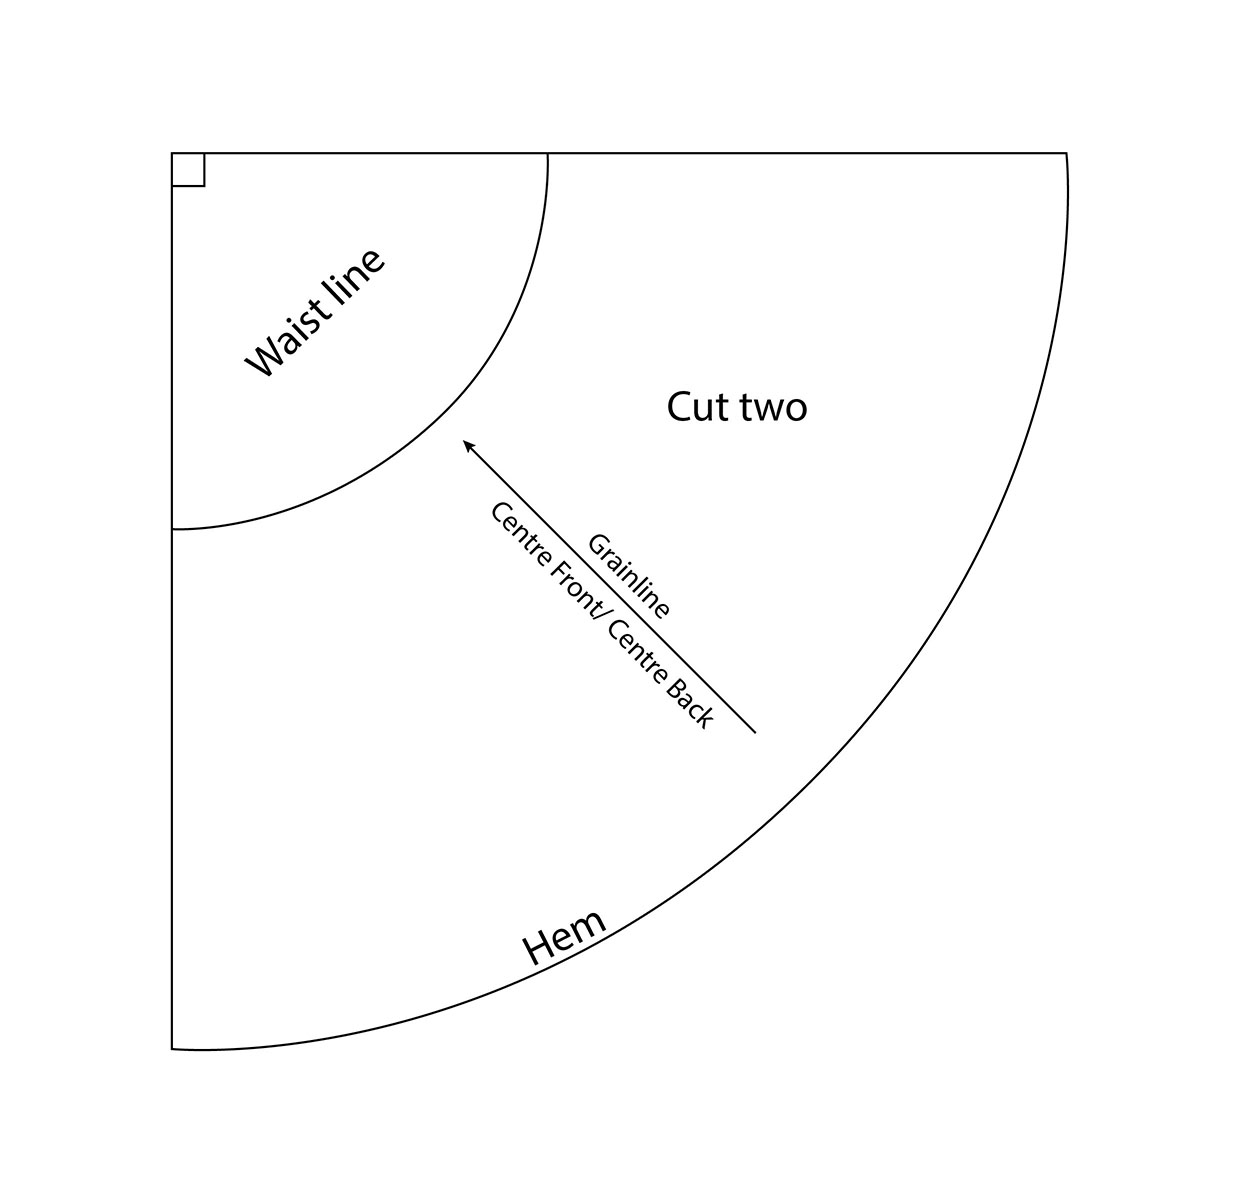
Trace off the pattern so you have a clean copy without the initial skirt length markings. Add your desired seam allowance to all edges, typically this is 1.5cm in dressmaking, but you can add 2cm at the hem if you’d like to finish the hem with a double fold hem.

Step 3

Label both straight edges as ‘Side Seam’ and draw a grainline through the centre of the pattern piece, at 45-degrees.

Drafting a skirt step 5

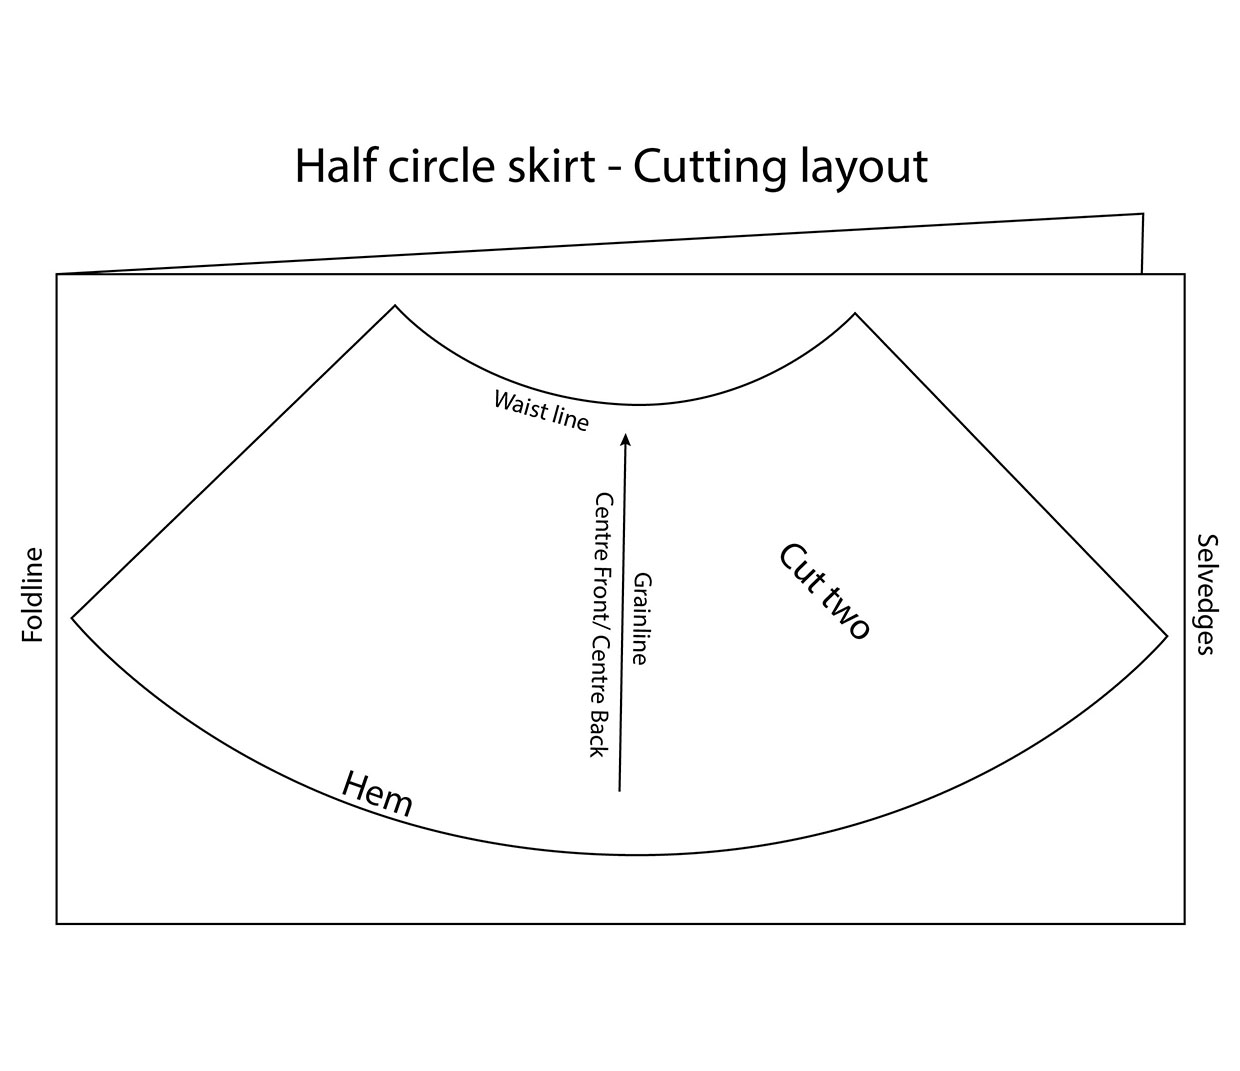
Cutting layouts – circle skirts

Step 1

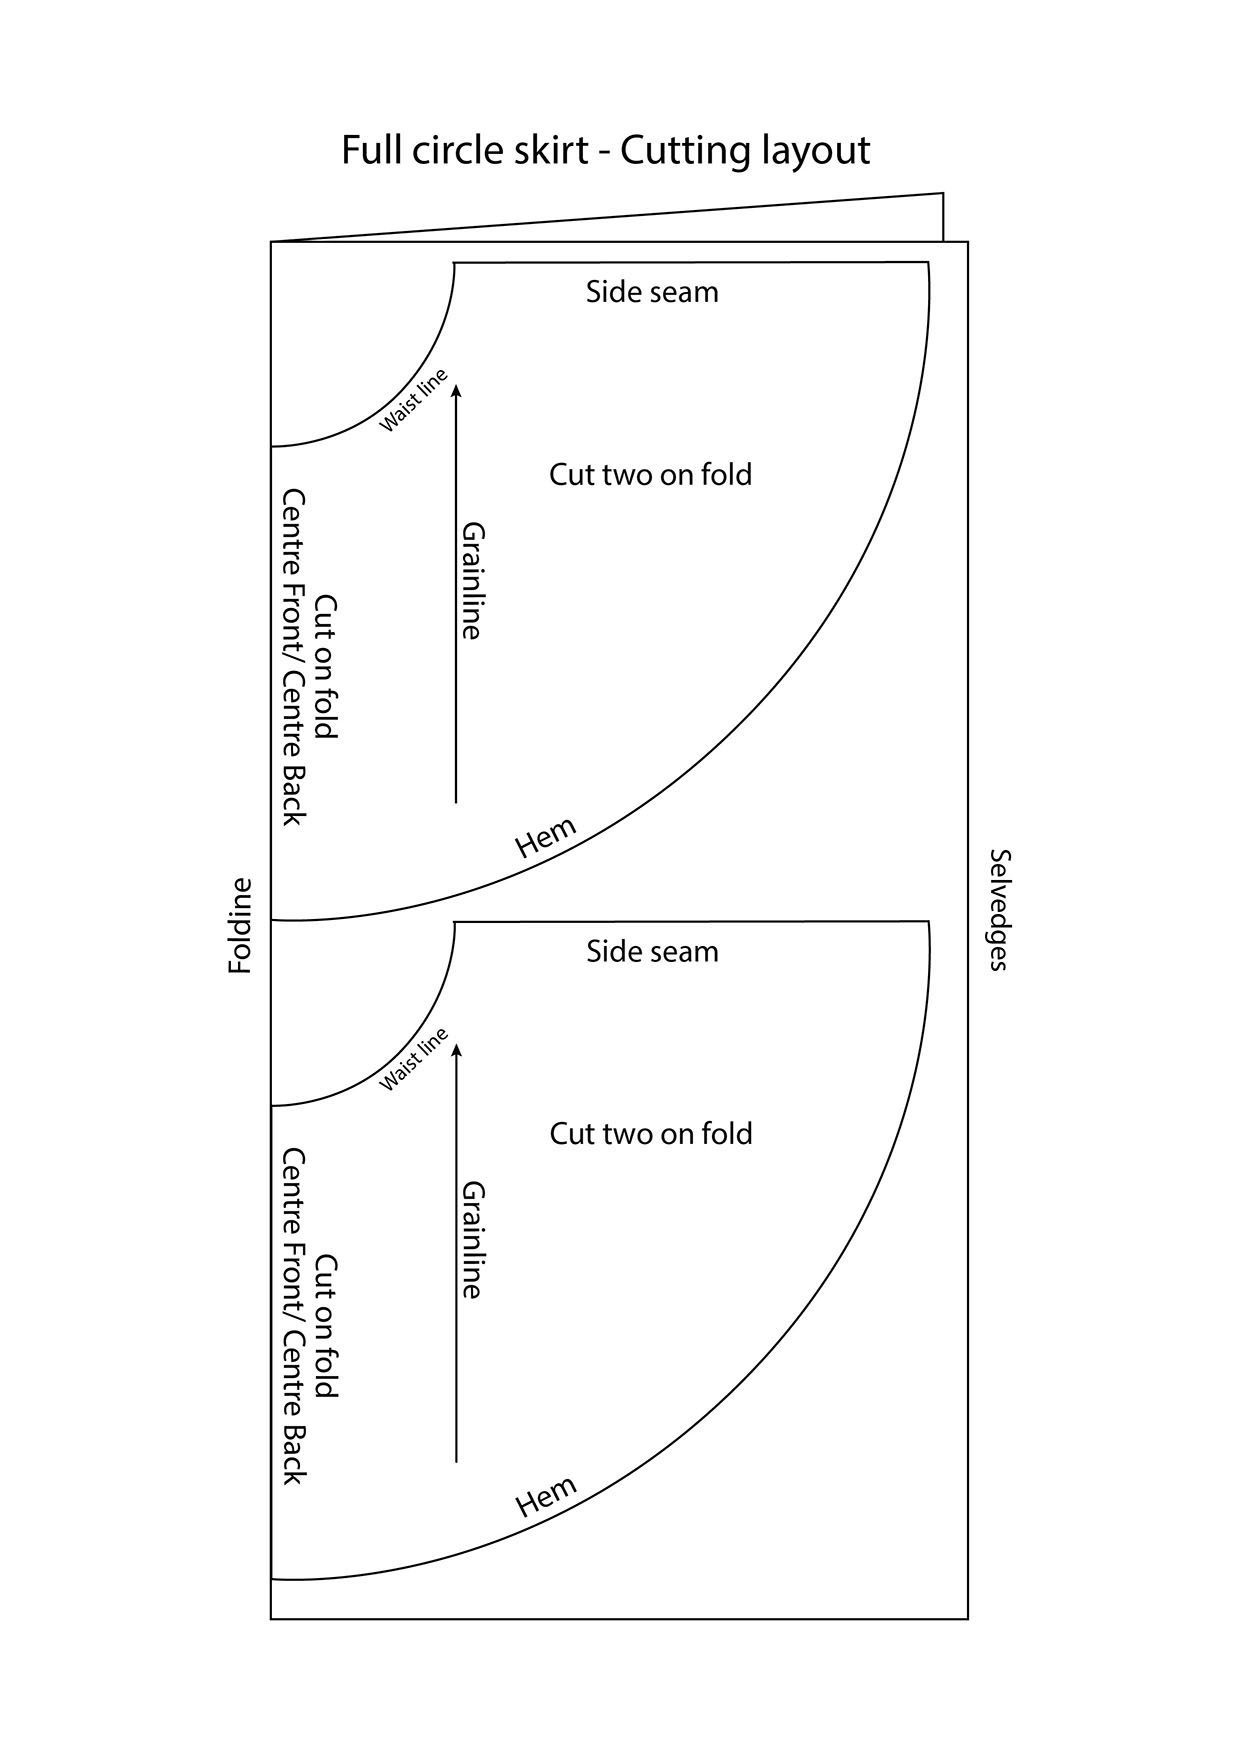
These cutting layouts are a guide to show you how to place your pattern pieces on the fabric.

Drafting a skirt step 6
Drafting a skirt step 7

Drafting a waistband for the panel skirt (optional)

Step 1

Decide on the desired finish width of your waistband, if you are using elastic in the waistband (instead of a zip or button fastening) then you can double the width of elastic and add 5mm to allow the elastic a little breathing space inside the waistband, then add seam allowance.

Step 2

The length will be the circumference of your skirt waist, plus seam allowance. You may also like to add 2-3cm ease to the length to allow for wearing ease and/or minor sewing errors. This ease can be edited out at the toile stage.

Step 3

Add a grainline running along the width.


Drafting the pattern – panel skirt

Step 1

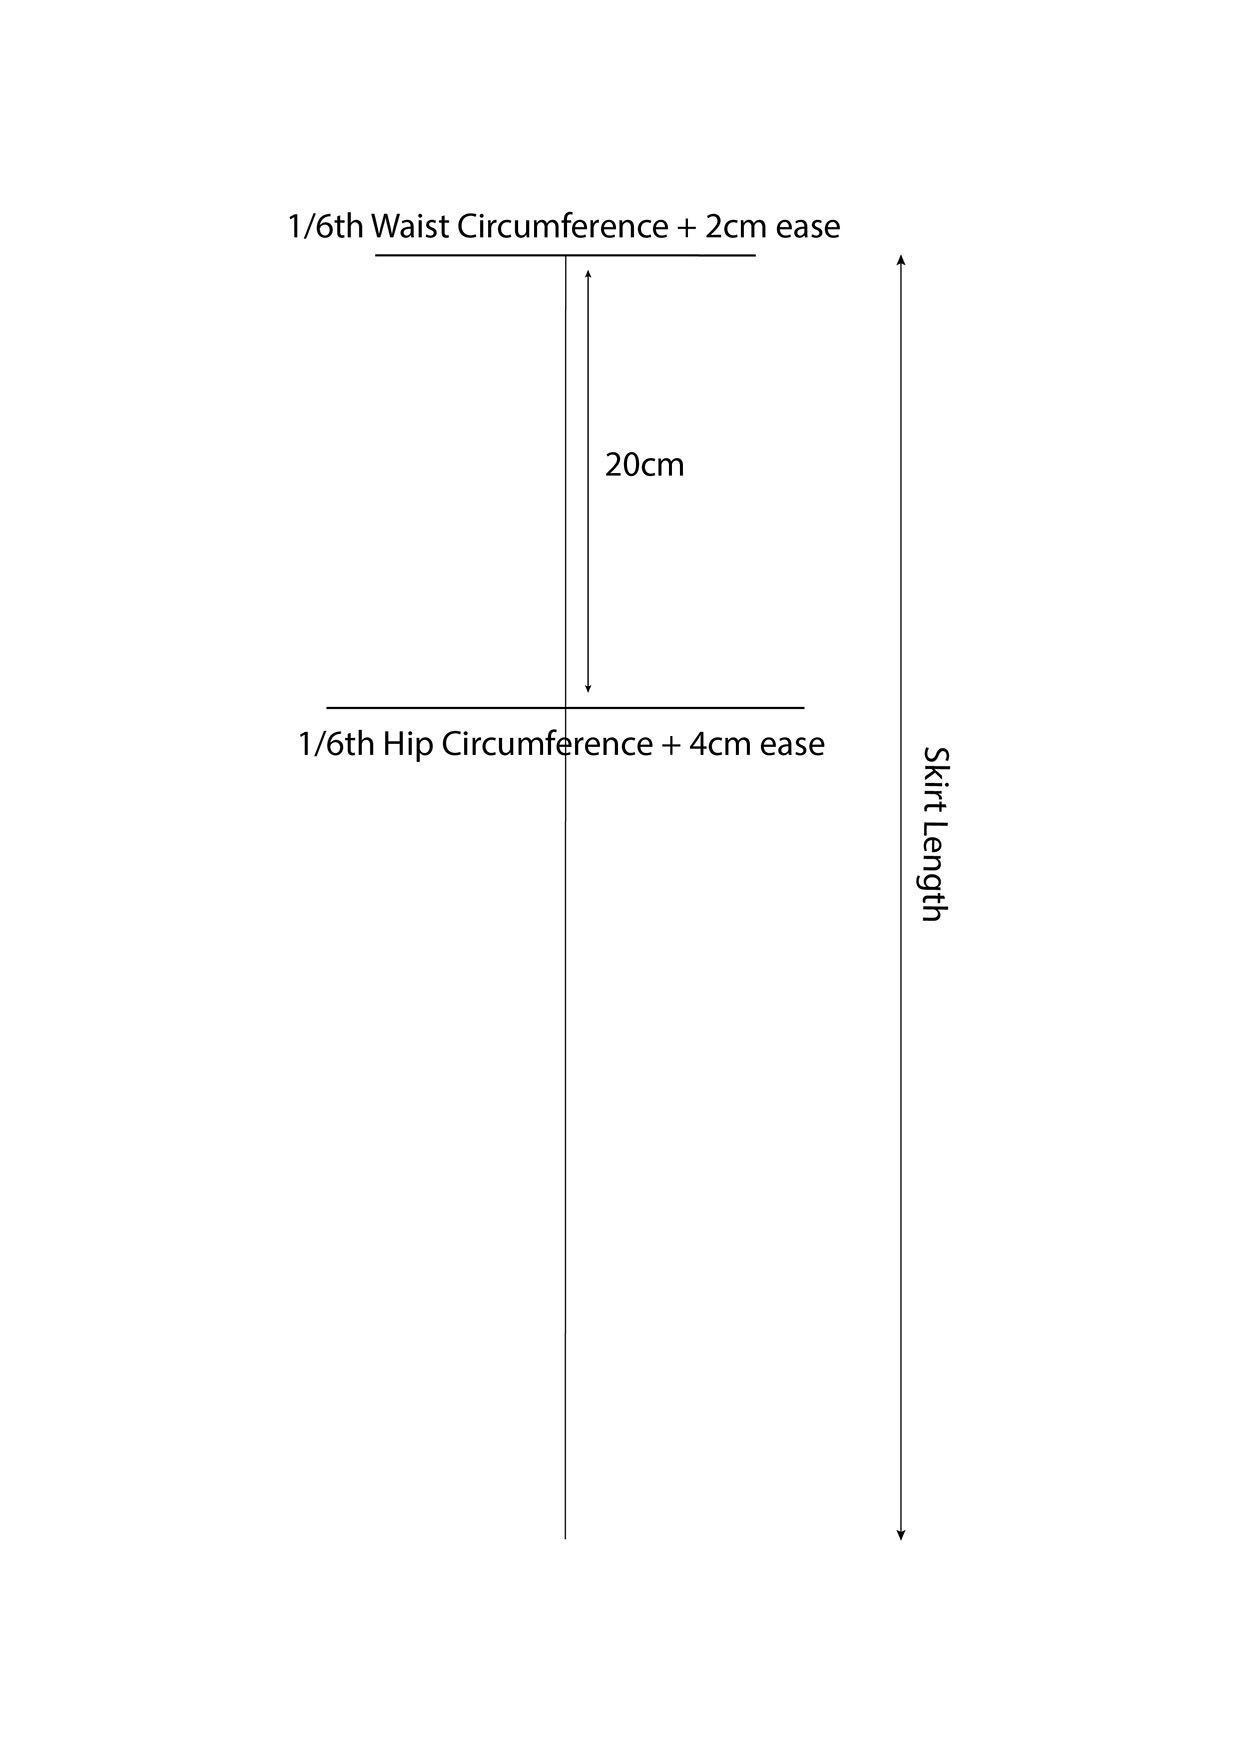
You can use a mechanical pencil to draft the entire pattern but if you are drawing lots of lines you may wish to use coloured fineliners to distinguish between the lines. This skirt will have six panels in total, three creating the front and three creating the back of the skirt. If you would like more panels simply alter the division of your waist and hip measurements. E.g., 18th for an eight-panel skirt, or 110th for a 10-panel skirt. The ease will remain the same unless you would like a skirt with more flare. Step one Begin by drawing a horizontal line that is 16th of your waist measurement + 2cm ease.

Step 2

Find the centre of this line and draw a vertical line down from this point that measures your desired skirt length.

Step 3

Measure 20cm down from the top of your skirt length line and make a mark.

Step 4

At the 20cm point, draw another horizontal line, this time measuring 16th of your hip measurement + 4cm ease. This line should be centred on the length line.

Drafting a skirt step 8

Step 5

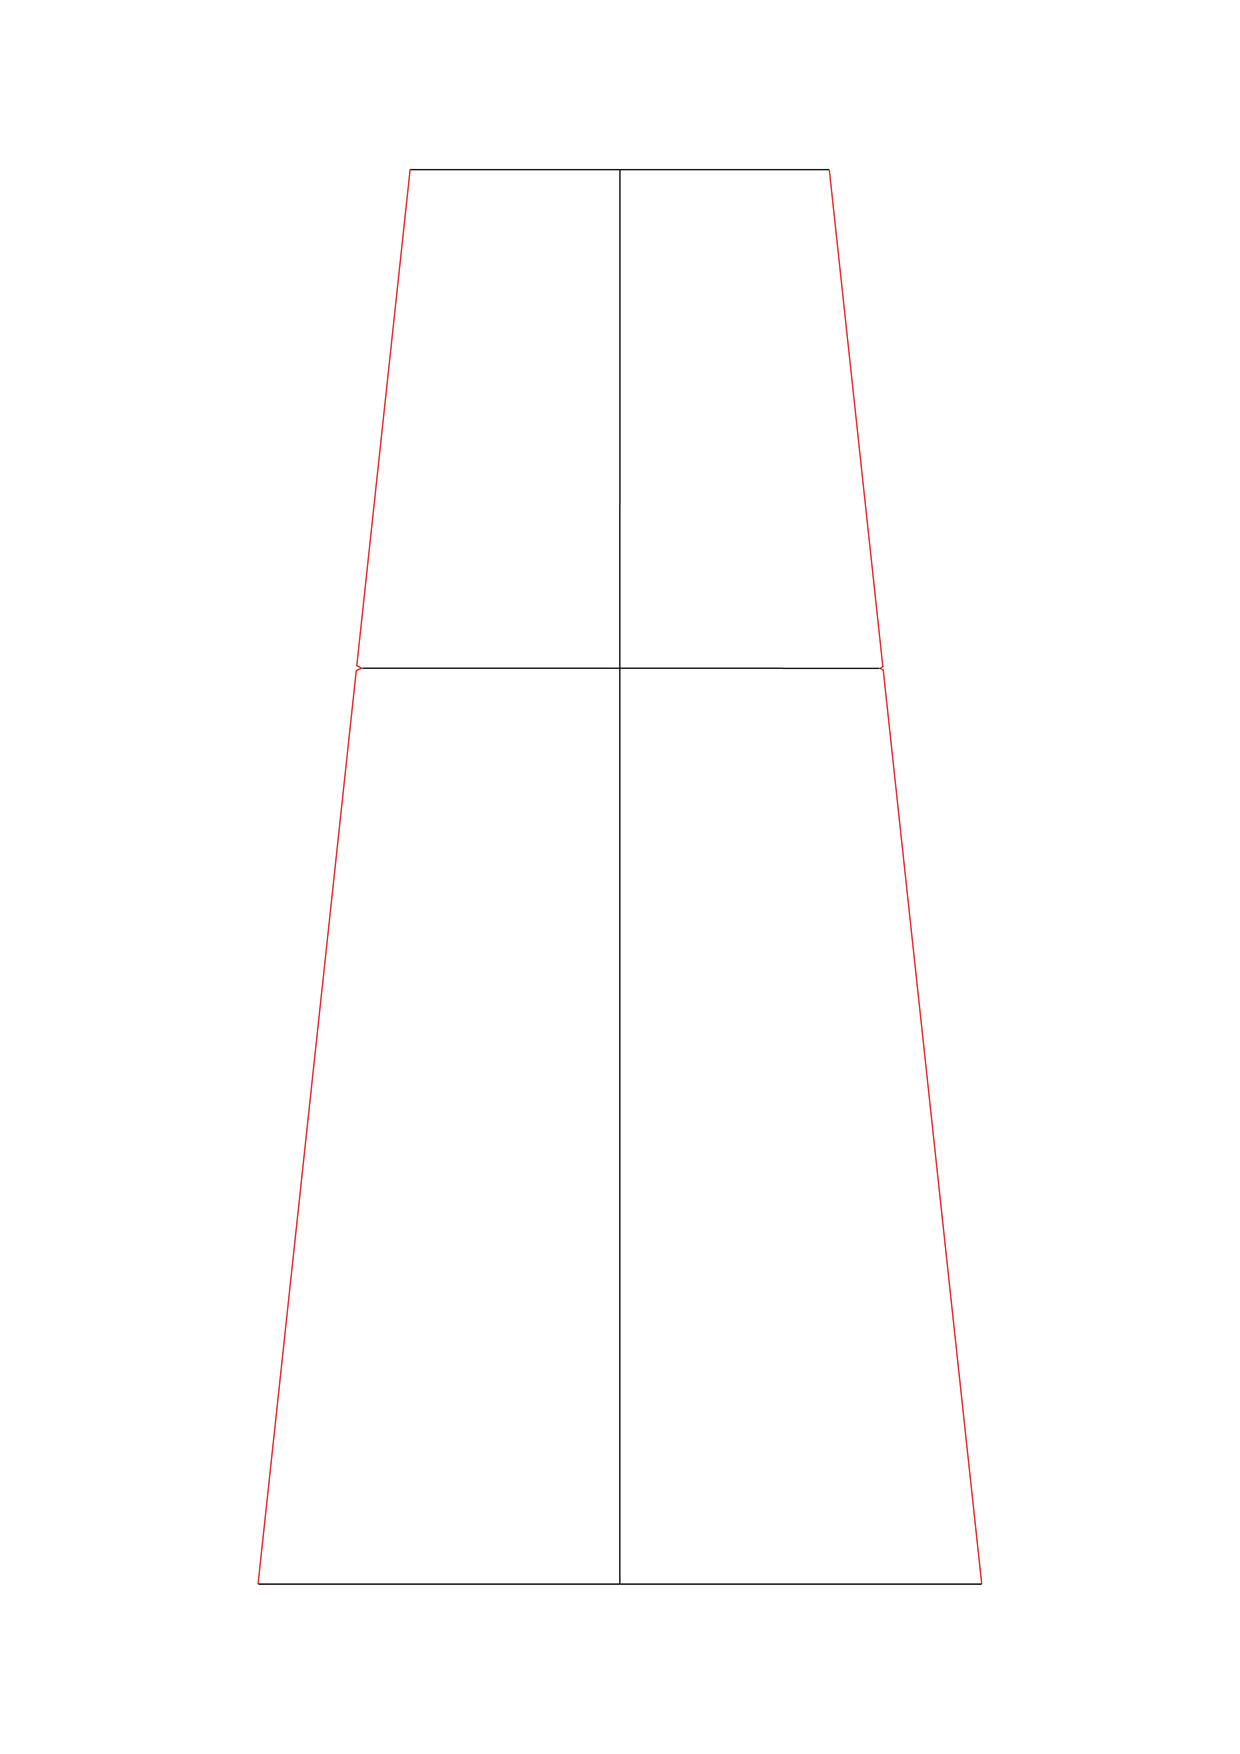
Connect the outer edges of the two horizontal lines, continue these lines down to the end of the skirt length line and join the three lines at the hem edge.

Drafting a skirt step 9

Step 6

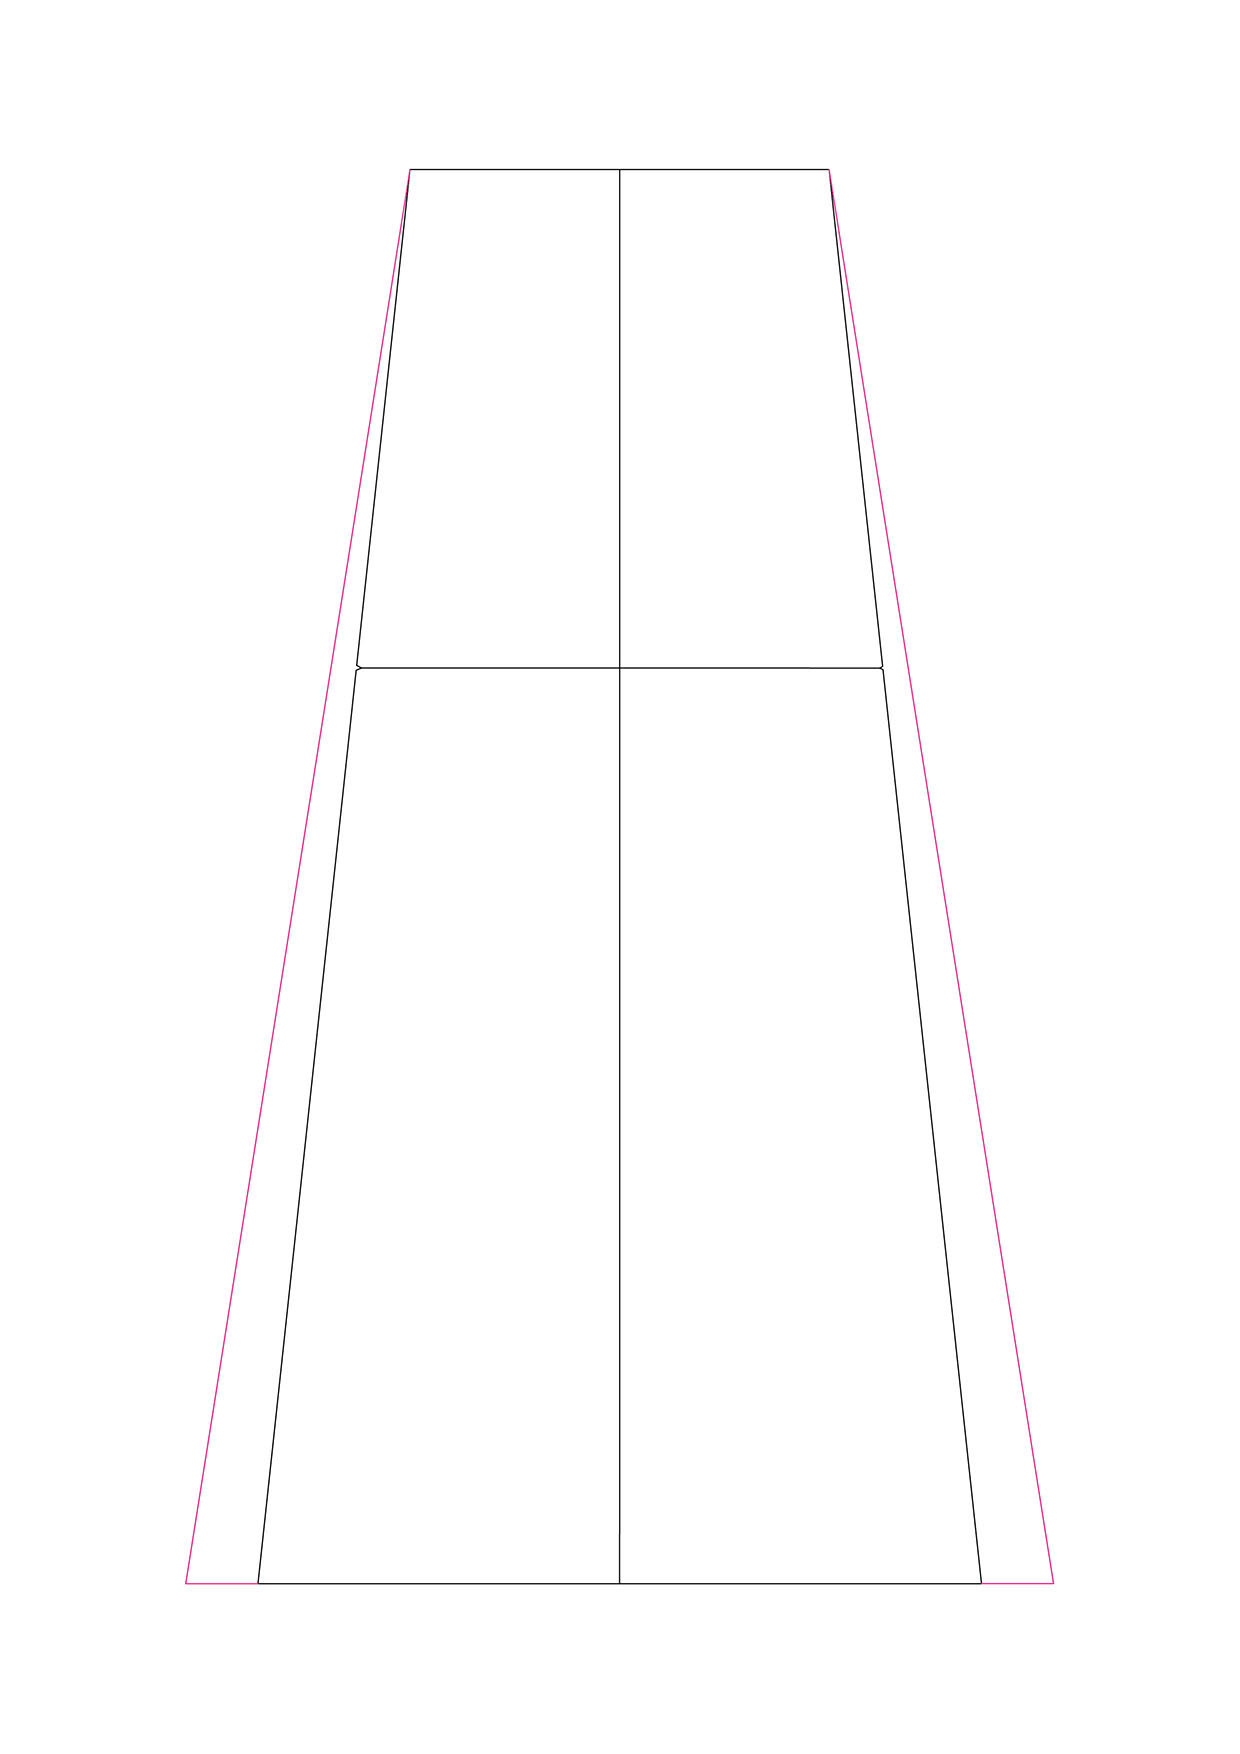
This will create a basic block that will fit you with enough ease to move and sit in. You can add more flare to the skirt if desired by increasing the ease added to the horizontal waist and hip lines.

Drafting a skirt step 10

Step 7

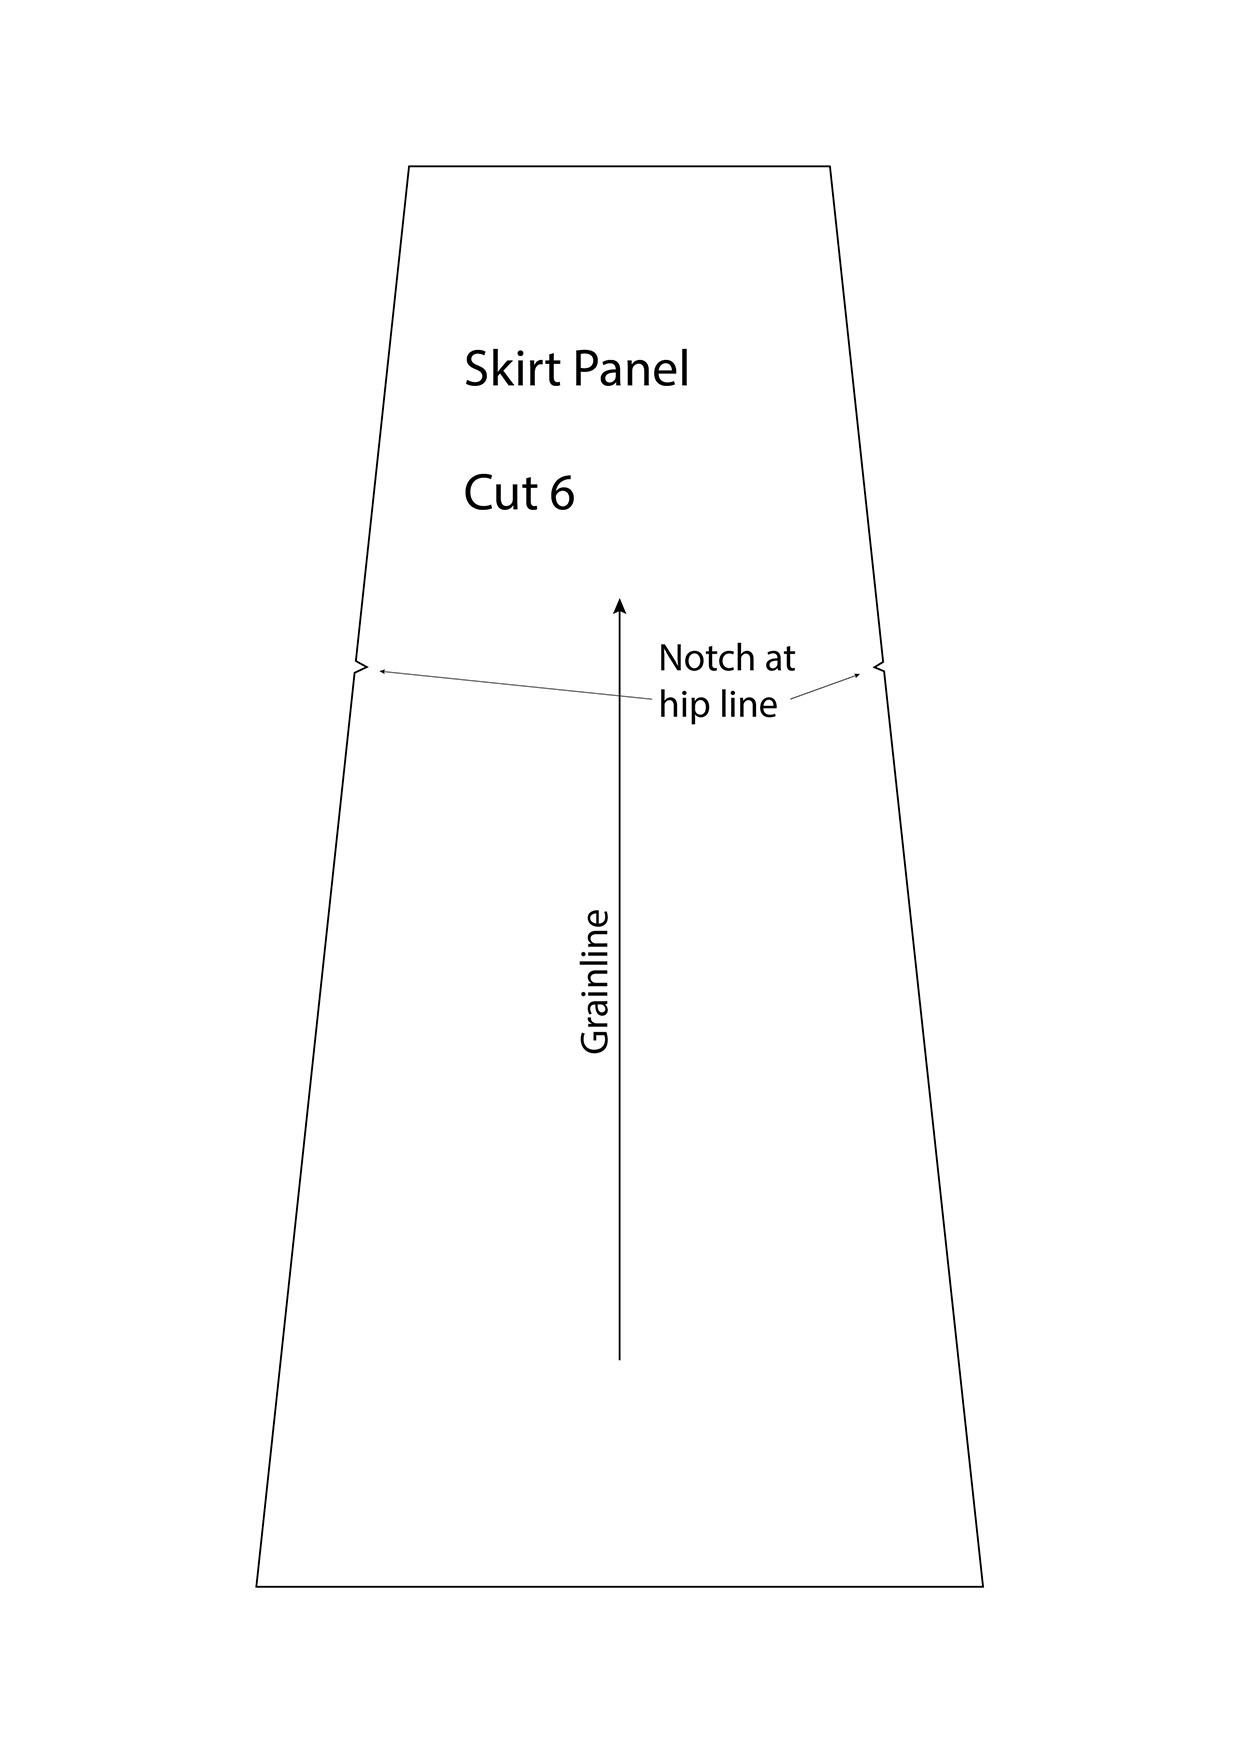
Trace off the pattern so you have a clean copy of just the outer lines. Add your desired seam allowance to all edges, typically this is 1.5cm in dressmaking, but you can add 2cm at the hem if you’d like to finish the hem with a double fold hem.

Step 8

Label this pattern: Skirt Panel, cut six. Draw a vertical grainline.

Drafting a skirt step 11

Adding the waistband for the panel skirt (optional)

Step 1

Decide on the desired finished width of your waistband. Double this measurement and add seam allowance.

Step 2

The length will be your waist circumference plus seam allowance. You may also like to add some ease (2-3cm) to allow for movement or slight errors in sewing, this ease can always be edited at the toile stage.

Step 3

Draw your grainline along the width.


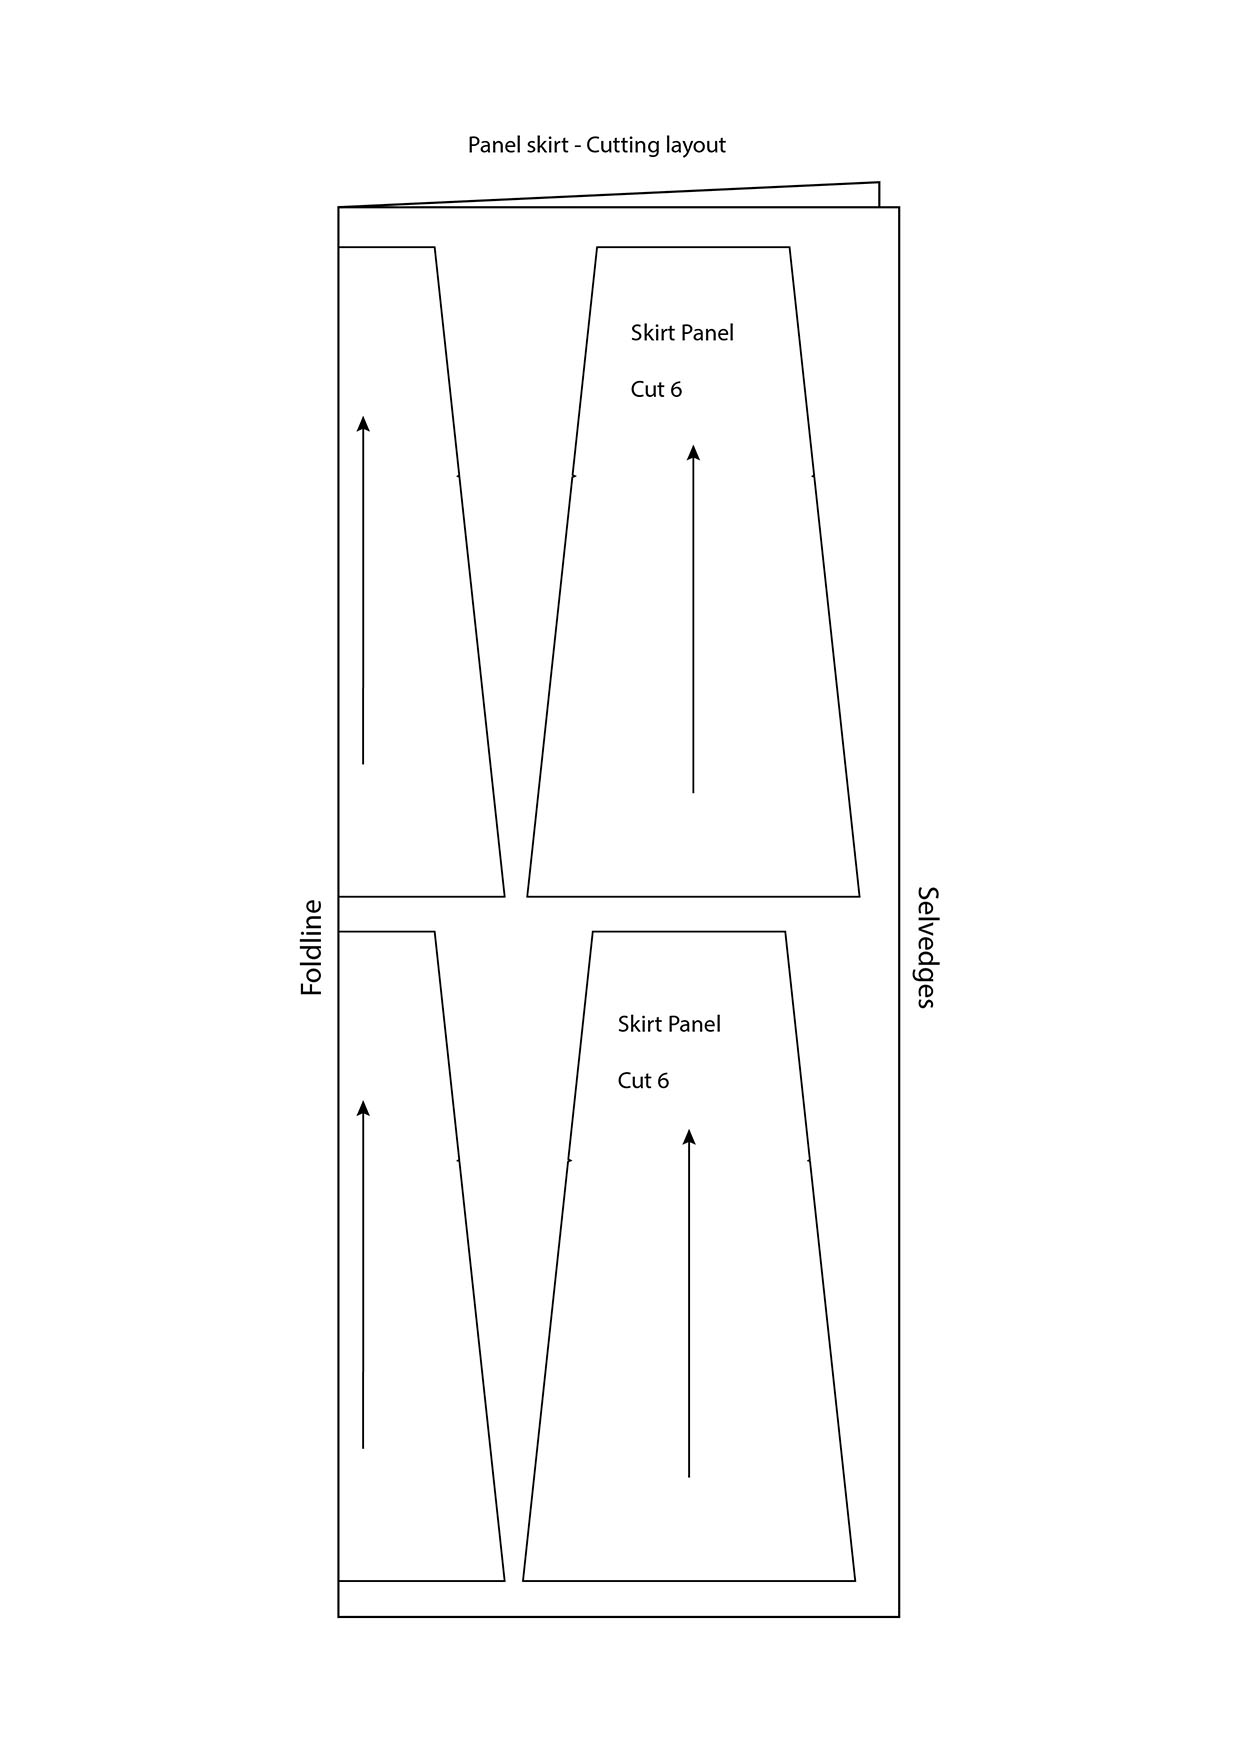
Cutting layout – panel skirt

Step 1

This cutting layouts are a guide to show you how to place your pattern pieces on the fabric. Depending on the flare added to your skirts and the width of your fabric you may need to lay the pattern out in a different way.

Drafting a skirt step 12

Finishing

Step 1

Label your pattern pieces with the pattern name, piece name and cutting information if you haven’t already. This is important as it will help you to see if a piece is missing. Even though you might think you’ll remember which piece is which in a year’s time, you’ll have no memory of which pattern a random piece belongs to – trust us!

Step 2

If you want to be extra organised, once you have made any necessary adjustments to the pattern you could also trace a copy onto manilla card – card patterns will stand the test of time and can be manoeuvred easily – their weight makes them great for tracing onto paper and they can be used to hack patterns if ever you decide to customise the design even further.

Toile making

Step 1

Run up a quick sample of your pattern to check the fit and make any necessary adjustments. These are instructions for drafting basic blocks to your measurements, so you may need to make additional amends such as curving the waist or hem edge, adding ease, or any details such as pockets/waistband details. For these reasons it’s essential to make a toile of your pattern draft.

You will also need to consider fastenings: zips, elastic, buttons etc, so don’t sew up the centre front/centre back or side seam of your toile (depending on where your fastening will go).

You will need to make sure there is ample seam allowance for your desired fastening, so add an additional 2-3cm along the fastening edges to be on the safe side – this can be edited out when you transfer any adjustments back to your pattern. Toile making doesn’t have to be a time-consuming task, you simply need to sew up the main seams.

Don’t worry about finishing seams, hemming or any other finishes – you simply need to check the fit and transfer any alterations to the pattern.

We hope you enjoyed this tutorial! You now know how to make a sewing pattern – have a go at making your own skirts at home.

Looking for more sewing patterns to make? Try our free pleated skirt pattern, learn how to sew a wrap skirt or have a go at our tunic sewing pattern.