How to make a paper star for Christmas

How to make a paper star for Christmas

These DIY origami Christmas stars will make your home sparkle this Christmas.

Try our magazines – get 6 issues from just £9.99!

Published: October 8, 2024 at 3:15 pm

It’s time to put up the tree and make some Christmas decorations! PaperShaker's simple paper star tutorial is a project the whole family can get involved in making. You can whip up these paper stars using paper scraps or last year’s Christmas gift wrap.

They're easy to make and beautifully festive, PaperShaker has given us this fab tutorial in celebration of their Christmas site mypaperwish.co.uk. Make and fold a whole bunch of paper Christmas stars to decorate your home with and hang them from your windows, tree, banister, and fairy lights.

Oh and if you need some beautiful papers to make your stars with then check out our free wallpapers on the blog. We have loads of Christmassy papers but also loads of funky geometric patterns if you're going for a more modern theme.

Now it's over to Papershaker for their paper star tutorial. Happy folding!

We also have a second tutorial at the end of this article for a variation on the paper star by Sue Hughes. Go to the end of this article for the bonus tutorial and template.
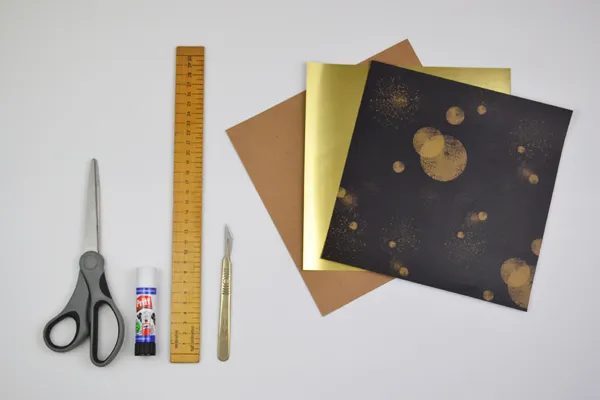
DIY origami Christmas decorations final

You will need:

  • Christmassy paper cut into 21cm squares
  • Pencil
  • Ruler
  • Scissors or craft knife
  • Glue
  • Ribbon or twine
  • Sticky tape

Top tip: Make squares out of your paper selections by folding diagonally in half and cutting away the surplus.

DIY origami Christmas decorations material

How to make a paper star for Christmas

If you’re looking for more Christmas paper folding then learn how to make cards with our fab free tutorials! We also have lots of seasonal free card making downloads so you can make your own beautiful festive cards.

Step 1

DIY origami Christmas decorations step 1
DIY origami Christmas decorations step 1a

Fold each sheet of paper in half, then rotate 90 degrees and repeat the fold. Rotate the paper 45 degrees and fold the points together (your paper should look like a triangle, with the point up). Repeat again, so you have made a total of four creases on your paper square.

Step 2

DIY origami Christmas decorations step 2

Using your ruler, measure out 4cm and make a mark with your pencil to create a boundary line up to which you will stop cutting on the four flat sides of your paper.

Step 3

DIY origami Christmas decorations step 3

Cut with the scissors or craft knife up to this point on each crease.

Step 4

DIY origami Christmas decorations step 4

Fold the paper on each side of the incision towards the corner forming a point. Repeat for the remaining corners. Your star is starting to take shape.

Step 5

DIY origami Christmas decorations step 5
DIY origami Christmas decorations step 51

Apply glue to one side of the point and fold the other side over it. Press to stick together. Repeat for the other three points. Set it aside to dry.

Step 6

DIY origami Christmas decorations step 6
DIY origami Christmas decorations step 6A

Repeat the 5 steps to duplicate the star for double the impact and create your 3D 8-pointed star! Got the origami bug? Check out these easy origami for beginners projects and get creative!

Step 7

DIY origami Christmas decorations final

Glue together and attach some twine or ribbon to the top with glue or sticky tape and hang along your mantelpiece, tree or wall. Add some fairy lights for extra Christmas magic! Paper star complete.

Bonus paper star tutorial

This fantastic 3D star decoration will look wonderful in your home for Christmas and other occasions. Use our template to make five separate points, and attach them together. Our step by step guide will show you how!

For her star, Sue Hughes has used American Crafts KnockOuts border punch set to further embellish each of the five points. Sue has used a simple circular punch for this design, but you can easily adapt this design to your chosen occasion by using a heart, snowflake, or any other decorative punch, or you can leave this off entirely for a solid star finish.

You will need

Step 1

How to make a christmas star out of paper 1

Trace the template onto festive paper and cut it out. Score and fold as shown on the template.

With the point folded, punch along the central score lines at each side. Repeat four times.

Step 2

How to make a Christmas star out of paper 3

Stick the thin tab to the reverse of the other side of the star point, as shown.

Push the point into shape, then fold the smaller outer tabs down. Repeat with the remaining four pieces.

Step 3

How to make a Christmas star out of paper 3

Apply glue to the outside of the tabs and attach to the inside of the next point. Join all the points in the same way with the last point closing the star.

Thread with twine or ribbon to make changing loop – either thread this through a punched hole, or pierce your top point with a sharp needle.

For coordinating decorations, you can also create a stylish garland strung with 3D stars in matching patterned papers –all you need is a star die, some glue and string. If you want to go for full festive sparkle, you could even create the star from foiled card, to make your Christmas shine!

Make your Christmas shine with our paper star tutorial

We hope you enjoy making your paper star and placing it on top of your tree. It's quick and simple to do, and before you know you'll be whipping one up for your friends and family. 

More papercraft fun for Christmastime

If you've enjoyed trying your hand at this paper star, you'll love having a go at our Origami Christmas decorations. From Christmas trees to pretty baubles, there's lots of folding fun to be had! 

Festive ideas to start today