Make your own cute sailboat embroidered romper

Looking for something truly special to give to an expectant parent? Embroider a cute romper with dreamy sailboats.

Try 6 issues of Love Embroidery magazine for just £9.99| SAVE 77%

Published: July 22, 2023 at 8:00 am

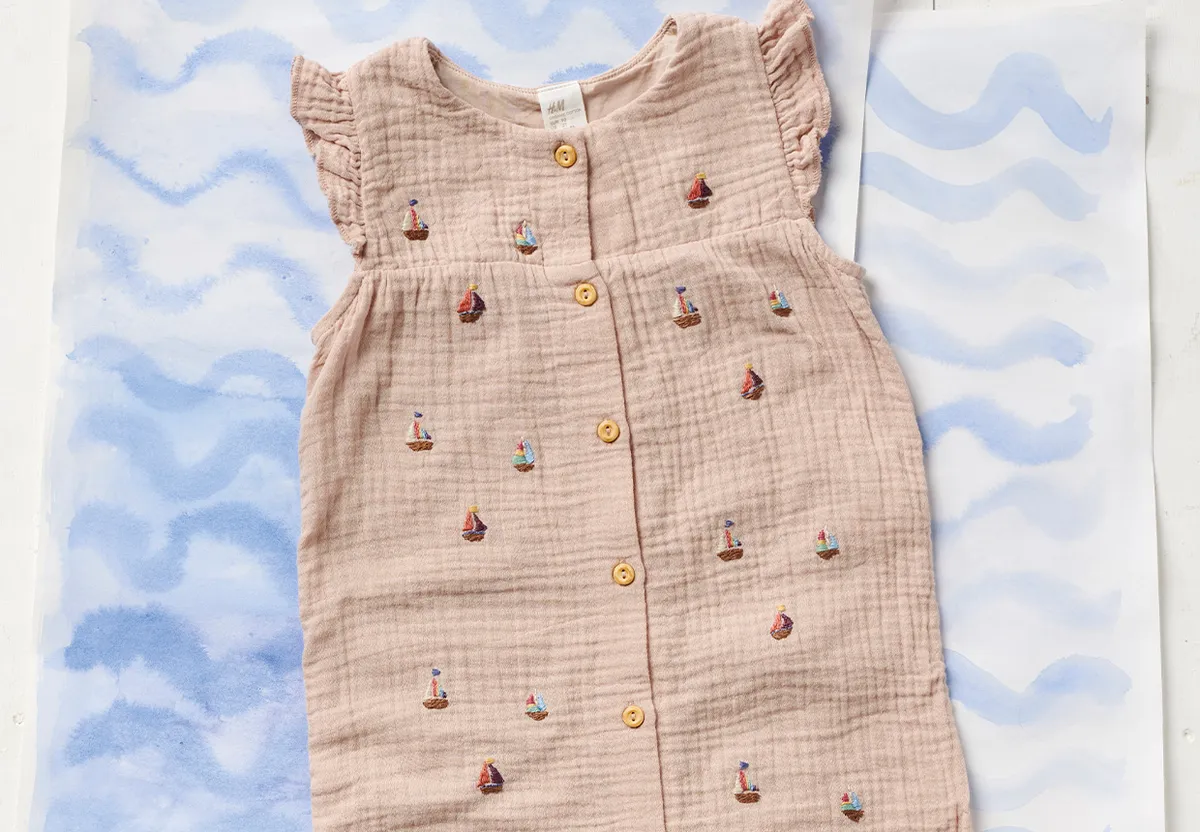
Are you looking for a special gift for expectant parents? This embroidered romper adorned with sailboats is the answer!

Embroidering clothes is an excellent way to add an extra special touch to an already thoughtful gift for a baby. Not to mention, adding your own embroidery makes a garment totally unique!

For this project, we’ve used a beige romper from H&M, but it will work with any plain-coloured romper. Opt for soft colours, like pastel pinks, blues or yellows, as they work particularly well for new babies.

The romper is then embroidered with tiny sailboats. We’ve done three sailboat designs with different coloured threads and stitch types. These can then be repeated across the romper as you wish. If you want to, you can also mix up the thread colours, and placement of the sailboats to suit your taste.

In order to transfer the design we have used an adhesive stabiliser, which will then dissolve when you wash your finished stitching.

Read on to find out the materials you’ll need, plus a handy step-by-step guide.

This project was designed by Jenny Billingham and first published in Love Embroidery issue 25.

Sign up for our embroidery newsletter to receive more beautiful embroidery patterns every week.

What stitches will I need to create the embroidered baby romper?

Are you looking for more tips and tricks to improve your stitching? Check out our embroidery stitch library.

What materials do I need to create an embroidered romper?

Top tips for the embroidered romper

  • Use three strands of thread throughout the design.
  • Ensure your threads are colourfast before stitching. You can test them by wetting a short length and leaving it to dry on a white tissue or a scrap of paper.
embroidered romper pattern

Step 1

Transfer the sailboat designs

Transfer the sailboat designs onto the stabiliser and then cut out each one with a 1cm border.

Step 2

Stick your designs to the romper

For this project, we positioned the three sailboats in a 13cm hoop and then repeated them across the romper, working one extra boat near the left sleeve and another two near the right leg.

Stick the designs onto the fabric one section at a time.

embroidered romper – transfer the design

Step 3

Stitching your first boat

For boat 1, stitch the rainbow sail using vertical Split Stitch in pink, orange, yellow, light blue, dark blue and purple, working one line for each shade.

Next, work the flag in Satin Stitch using dark blue.

Then, for the last sail, work horizontal Satin Stitch in cream.

Finally, use brown to work the bow of the boat section in horizontal Split Stitch.

embroidered romper – boat 1

Step 4

Embroidering your second boat

Moving onto boat 2, use vertical Split Stitch to work the tall sail in orange and horizontal Split Stitch to work the shorter sail in purple.

Add the flag using Satin Stitch in yellow.

Then, work a line of Backstitch in dark blue along the top of the boat.

Then fill the bow with Split Stitch in brown.

embroidered romper – boat 2

Step 5

Making your third boat

Now, for boat 3, work the striped sail using Satin Stitch in pink, yellow and green, starting at the top and working down in that order.

Then, use Satin Stitch in light blue to work the other sail.

Stitch the mast using Backstitch in cream.

Then fill the bow of the boat using Split Stitch in brown.

embroidered romper – boat 3

Step 6

Repeat the three designs across your romper

Repeat the three boat designs all over the romper as we did, or mix up their positioning and orientation to your liking.

You could also try switching the colours of each boat to create a more varied pattern.

embroidered romper – repeat designs

Step 7

Soak your romper to remove the stabiliser

Once you’ve finished embroidering all the boats, ensure your threads are neatly secured at the back.

After that, immerse all the stitched areas of the romper in warm water to remove the stabiliser. Rinse thoroughly to remove all the little bits.

Lay the romper out flat to air dry.

embroidered romper – soak

Looking for garments for toddlers?

Embroidery this absolutely adorable embroidered bucket hat – ideal for transport-loving little ones.

Beautifully embroidered baby clothes

There’s something extra special about receiving a handmade gift! This embroidered baby romper will go down a treat with expectant parents and make a lovely keepsake once the baby grows out of it.

More ways to celebrate a new baby

Looking for more ways to incorporate your embroidery skills into baby clothes? Try this gorgeous baby bonnet embroidery tutorial.

Light pink baby bonnet with ladybird and floral embroidery details. It sits on a dark wood background with a yellow teddy bear next to it and a white and yellow stripy top to the bottom left.