Magic Loop knitting

Magic Loop knitting

Knit small diameter projects in the round using the Magic Loop knitting technique. Rosee Woodland and Jane Crowfoot explain how it's done.

6 issues of The Knitter magazine for just £9.99|Save 79%

Published: April 12, 2021 at 2:11 pm

There are a number of different methods you can use for knitting in the round, and in this guide we take a look at the Magic Loop knitting technique, with the help of designers Jane Crowfoot and Rosee Woodland. Magic Loop knitting is used when you're working with small diameters in the round, and is an alternative to knitting in the round with two circular needles or learning how to knit with double pointed needles.

"The Magic Loop knitting technique was first devised by Sarah Hauschka, and involves using a singular circular needle to knit small-diameter projects in the round, such as socks and mittens." says Jane. "Some people advise that you should use a circular needle with a long cable such as an 80cm or even 100cm length, and no shorter.

"However, all lengths of circular needle are suitable except for the very short, although around 100cm does work particularly well for socks. If you have an abundance of circular needles to choose from, then it is worth taking the time to sift through your collection for those that have relatively short needle tips and a smooth join between the wire and the needle tip." Need new needles? We can help you choose with our guide to interchangeable knitting needles.

In the first part of our tutorial, Rosee explains how Magic Loop knitting is done step-by-step. Then Jane returns with some handy tips to help you get perfect results every time. You'll find it easier to learn if you're already familiar with knitting with circular needles, so we recommend you check that out first. Ready? Let's go!

Magic Loop knitting

You will need:

  • Yarn
  • Knitting needles

Step 1

Cast on the required number of stitches plus one extra stitch onto a long circular needle (at least 80cm long).

Magic Loop knitting step 1

Step 2

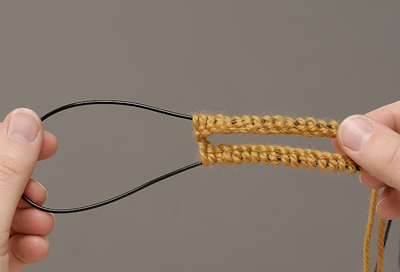
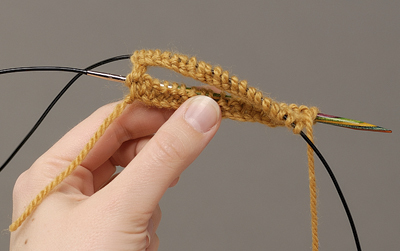
Push the stitches along the wire to its centre and then, (as shown below) bending the wire slightly in half, pull a loop of wire out, from between the two central stitches.

Magic Loop knitting step 2

Step 3

You will now have two sets of stitches, each about half a row/round.

Magic Loop knitting step 3

Step 4

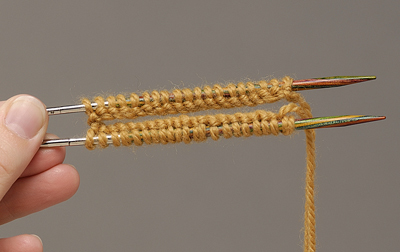
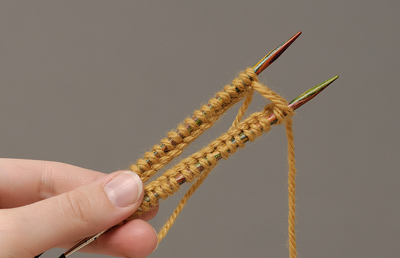
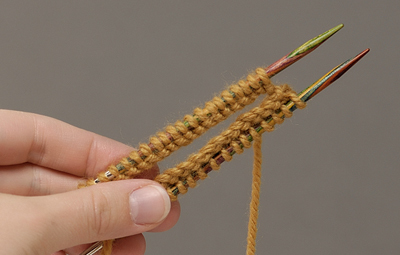
Push these two sets of stitches along the wire until half your stitches are on each needle, near the tips, with the last st cast on sitting on the tip end of the BACK needle, and the first st cast on sitting on the tip end of the FRONT needle.

Now, holding your needles parallel, with the tips to the right, pull the needle tip at the FRONT to the right until the stitches at the FRONT are now on the wire.

Magic Loop knitting step 4

Step 5

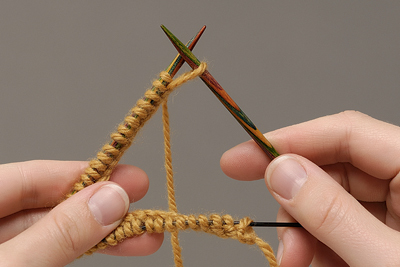
Catch the first stitch on the BACK needle and slip it as if to knit, onto your FRONT needle.

Magic Loop knitting step 5

Step 6

The last and first stitches you cast on should now be sitting next to each other.

Magic Loop knitting step 6

Step 7

Push the FRONT needle to the left again, so that the stitches move back onto it.

Magic Loop knitting step 7

Step 8

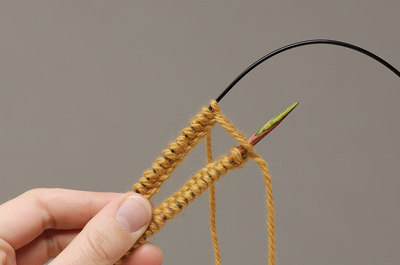
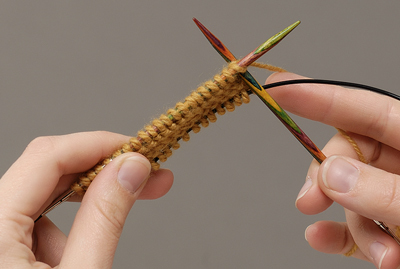
Now, again holding your needles parallel, with the tips to the right, pull the needle tip at the BACK to the right until the stitches at the BACK are now on the wire.

Magic Loop knitting step 8

Step 9

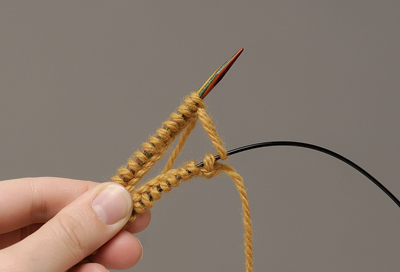
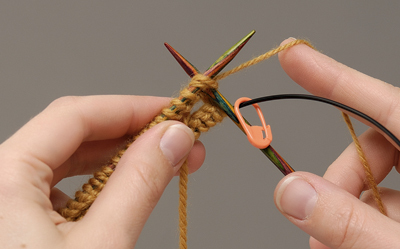
Place a stitch marker on this needle. Insert the tip into your first two stitches on the FRONT needle, and knit or purl them together.

Magic Loop knitting step 9

Step 10

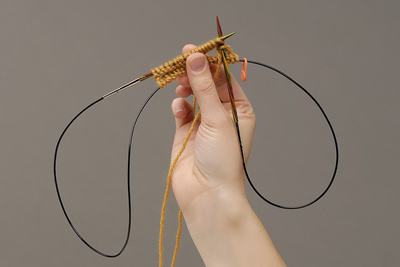
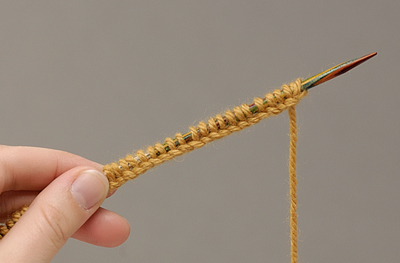
You will see a loop of wire at either end of the double row of stitches. This is where the name Magic Loop comes from. **Continue to knit until you have worked all stitches on the needle facing you. Turn your work through 180 degrees horizontally, so that the unworked row of stitches is now facing you.

Magic Loop knitting step 10

Step 11

Now, again holding your needles parallel, with the tips to the right, pull the needle tip at the BACK to the right until the stitches at the BACK are now on the wire.

Magic Loop knitting step 11

Step 12

Push the FRONT needle to the left again so that the stitches move back onto it.

Magic Loop knitting step 12

Insert the tip of the BACK needle into the first of the FRONT stitches. Knit the first stitch as you would normally. Repeat from ** to the end of the second needle.

You have now worked one full round and should have a stitch marker at the beginning of your round.

Continue to work as set.

Patterns to knit with Magic Loop

Put your new Magic Loop knitting skills into practise with a stylish accessory pattern! Why not cast on our free men’s socks knitting pattern and free cable socks knitting pattern, or take your pick from our best hat knitting patterns?

Magic Loop knitting: tips and tricks

Get great results from your Magic Loop knitting with these handy hints from Jane Crowfoot.

Avoid ladders in Magic Loop knitting

Many knitters find that they achieve a looser tension on the final stitch knitted from one needle and the first stitch knitted from the second needle (or at the point where the cable is pulled through when using the Magic Loop method). This uneven tension can create a ladder and is common when knitting on circular needles or sets of double-pointed needles.

Many tutorials will advise that you make sure you work a really tight stitch when starting work on a new set of stitches. However, this can often over-compensate for the loose tension and cause an overly tight stitch, which in turn makes the stitch either side of it seem baggy.

With the Magic Loop knitting method you can create an even tension by slipping the last stitch worked from the back needle onto the new needle tip before you start working on the next set of stitches.

Inside out Magic Loop knitting

You may find after a few rows that you have the wrong side of your work facing you. For example, when working stocking stitch you find that the purl side of the fabric is facing you and that the knit side is on the inside of your tubular piece of knitting. This is because – in your excitement at how great these techniques are – you have changed direction and knitted across the back set of stitches and left the front set on the wire rather than knitting the front set and leaving the back set of stitches on the wire, when holding them in the left hand.

When working a tubular piece that has an open end, such as a mitten or a sock, you can correct this by simply turning your knitting ‘inside out’ so that the right side of the fabric is facing you. However, if you have done this when knitting a finger of a glove, for example, you will have no choice but to unpick.

Dealing with wires while Magic Loop knitting

If circular needles are stored curled in a loop for a while (especially those with a long connecting cable) you may find it hard to uncurl the wire. This can mean that you struggle to keep the wires under control and can lead to you mistakenly twisting your knitted stitches or looping the yarn around the needle wire whilst working your stitches.

To prevent your wayward wires from making things tricky, simply submerge the cables in a bowl of very hot water for half an hour. Then leave to dry and cool off in a straight position (you may want to weigh them down so that they stay put).

If you haven’t enjoyed using circular needles in the past, it is worth knowing that they have improved enormously over the last decade and many now exist with beautifully smooth cable-to-tip joins and flexible cables. Both Magic Loop and using two circular needles are methods for knitting small numbers of stitches in the round. However, if you don’t enjoy either of these, then don’t forget that instead you can use double-pointed needles (DPNs) for small diameter knitting.

Now you’ve mastered the Magic Loop knitting method, why not try out other knitting techniques using our how to knit tutorials? Or find something to cast on with our knitting patterns.