How to crochet Solomon's knot

How to crochet Solomon's knot

Learn how to make the lacy Solomons knot crochet stitch - it's easier than you think!

Try 3 issues of Simply Crochet magazine for just £10!

Published: July 7, 2021 at 8:00 am

A wonderfully versatile stitch, the Solomon’s knot crochet stitch is simple enough even for complete crochet beginners and creates a pretty, lacy fabric that’s perfect for shawls, throws and a host of other accessories and homewares. Usually abbreviated in patterns as ‘SK’, this vintage stitch is also sometimes called lover’s knot, hail stone, knot stitch and crochet love knot.

Each Solomon’s knot crochet stitch has two parts: an elongated loop of yarn, and a ‘knot’ at the end of the loop that’s similar to a double crochet stitch. The loop part can be whatever length you like, although a pattern should always tell you how long to work the loop. The knot section secures the loop at the length you’ve made it and provides a solid stitch that you can work into on your next row.

After an initial base row, you join alternate knots together using double crochet stitches to form the airy Solomons knot mesh. This makes it very fast to form the fabric, filled with pretty loops of yarn – perfect for that extra special skein that’s been waiting in your yarn stash. In this tutorial Becky Skuse explains just what to do, and then you can put your newfound Solomon’s knot skills into practice with this Free Solomon's knot crochet shawl pattern!

How to do Solomons knot crochet stitch

Mastering the basics of Solomon’s knot.

It’s very simple to start working Solomon’s knot, using any yarn and a suitable hook. Try starting by using a DK yarn and a 4mm hook and keep your tension fairly loose.
You will need:

  • Yarn
  • Crochet hook
  • Ruler

Step 1

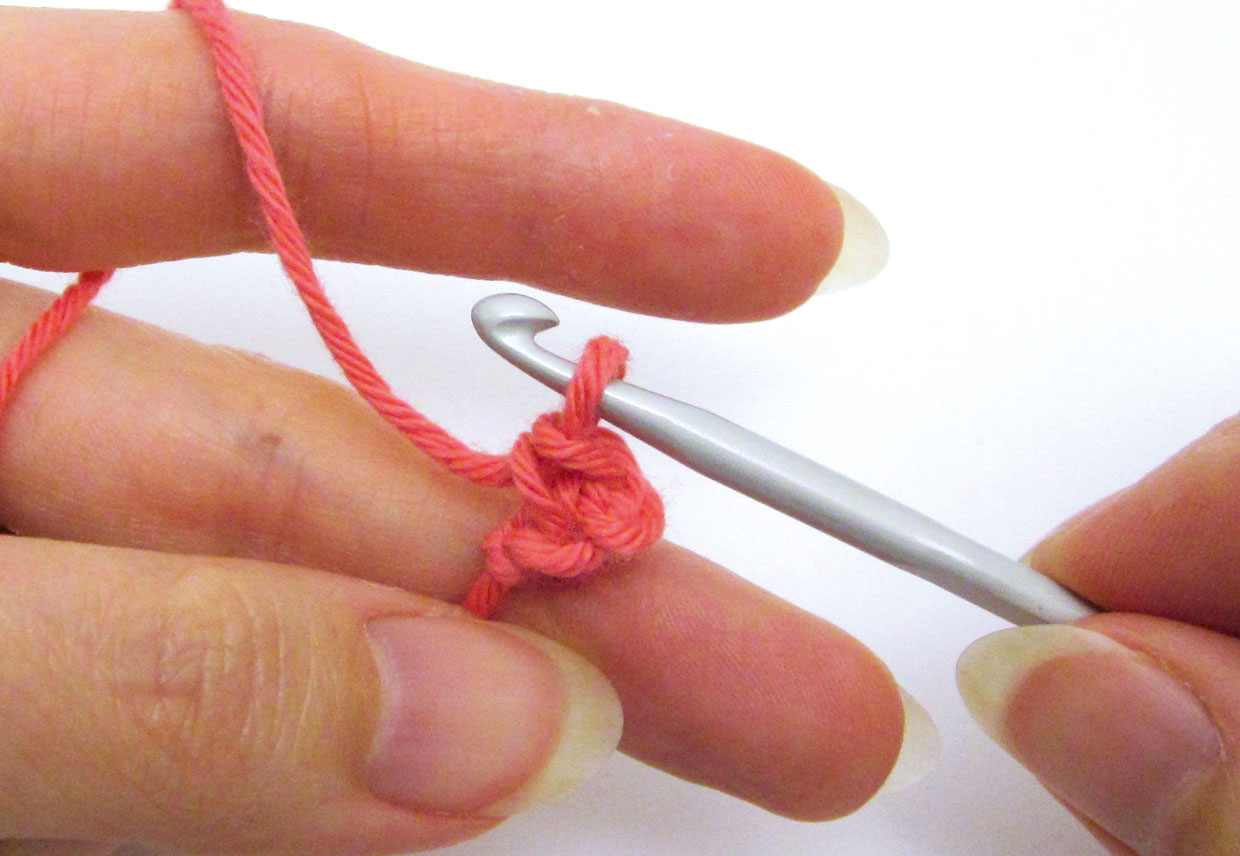
First of all, you need to make a base knot. To do this, make a slipknot, chain 2 and dc in the second chain from the hook.

How_to_crochet_solomons_knot_Step_01

Step 2

Now you can work your first Solomon’s knot, starting with the loop part. Use the hook to elongate the working loop that’s on the hook. You can make the loop whatever length you like – if you’re using a DK yarn, try pulling the loop until it’s about 2cm long. When you’re first learning the Solomon’s knot crochet stitch, it’s a good idea to keep a tape measure or ruler with you to check the size of your loops, until you can make them consistently the same length by eye. Read on to secure the loop by working the knot part.

How_to_crochet_solomons_knot_Step_02

How do I work the knot section?

To secure the loop part, you need to work the knot section of the Solomon’s knot crochet stitch

Step 1

Start by working yrh and pull through elongated loop (1 loop on hook).

How_to_crochet_solomons_knot_Step_03

Step 2

Examine the elongated loop –it’s just like a long chain st, with two strands of yarn at the front and one strand at the back.

How_to_crochet_solomons_knot_Step_04

Step 3

Insert the hook in between the front loops and the back loop.

How_to_crochet_solomons_knot_Step_05

Step 4

Yrh and pull up a loop (2 loops on hook).

How_to_crochet_solomons_knot_Step_06

Step 5

The long loop will now be secured and you can finish off the crochet knot by working yrh and pull through both loops on hook. This is just like working a dc so sometimes this knot section is called a double crochet knot. The knot will look similar to a dc, with two loops at the top that you can work into on the next row.

How_to_crochet_solomons_knot_Step_07

Step 6

Make another Solomon’s knot by repeating the instructions from Step 2. You can make as many knots as you like for this first row, as long as you have an even number. Try working eight Solomon’s knots.

How_to_crochet_solomons_knot_Step_08

How do I work the second row?

Next, we’re going to start working dc stitches to join the knots together.

To start with, orientate your first row of Solomon’s knots so that the two front strands of the elongated loops are running along the top.

Step 1

Now count four knots back, not counting knot nearest to hook. You’ll need to work a joining dc into this fourth knot.

How_to_crochet_solomons_knot_Step_09

Step 2

To do this, insert the hook under the top 2 loops of the dc knot and work a dc stitch as usual: yrh, pull up loop, yrh, pull through both loops on hook.

How_to_crochet_solomons_knot_Step_10

Step 3

You will have joined two knots together and formed a diamond shape in the mesh.

How_to_crochet_solomons_knot_Step_11

Step 4

Work another two Solomon’s knots. Skip one knot on the row below and dc into the next knot, following the instructions in Step 2.

How_to_crochet_solomons_knot_Step_12

Step 5

You will have formed the next diamond shape.

How_to_crochet_solomons_knot_Step_13

Step 6

Repeat Steps 4-5 to the end, working your final joining dc into the base knot. With our example of working eight Solomon’s knots on Row 1, you should now have three diamond shapes at the end of Row 2.

How_to_crochet_solomons_knot_Step_14

How do I work a pattern row?

Now the first two rows are completed, we’re just going to keep on going.

Once you’ve completed the first two rows, you’ll have all the skills you need to work the pattern row and so create a piece of Solomon’s knot fabric as large as you like. Start by turning your work and again, make sure the two front strands of the elongated loops are running long the top.

Step 1

Begin the pattern row by working three Solomon’s knots.

How_to_crochet_solomons_knot_Step_15

Step 2

Count four knots back from where you are, not counting the knot nearest to the hook, and dc into this knot to form a diamond shape.

How_to_crochet_solomons_knot_Step_16

Step 3

Work another two Solomon’s knots, then skip one knot on the row below and dc into the next knot.

How_to_crochet_solomons_knot_Step_17

Step 4

Repeat Step 3 to the end, working your final joining dc into the last available knot along the top, as shown – don’t work into the knot at the side of the fabric.

How_to_crochet_solomons_knot_Step_18

Now you can repeat this pattern row until your piece is any length you desire. You’ll see that each Solomon’s knot row forms a zigzag pattern so that the fabric forms a diamond- shaped mesh. At the end of each row you’ll still have three diamond shapes, but they will be slightly off-set as they tessellate. For a handy visual guide to help you follow how the Solomon’s knots and the dc joins work, see the chart below.

How_to_crochet_solomons_knot_chart

How can I vary the look?

free_solomons_knot_scarf_crochet_pattern_closup

There’s plenty of scope to get creative with the Solomon’s knot crochet technique, such as by adding a decorative edging to the fabric. You can also combine it with standard crochet stitches or other special techniques, such as hairpin or broomstick crochet, to create beautiful pieces of lacework.

Try varying the look by working shorter loops on the Solomons knot at the edge of the work so that the sides become straight instead of zigzagged. You can also use different stitches to join the knots, so try swapping double crochet stitches for trebles.

Once you’re more confident with the technique, you could also try a more traditional Solomon’s knot joining method. Instead of working a dc into the knot below, try working 2dc under the front two strands of the elongated loops – work one dc into the loop before the knot on the row below and another dc into the loop after the knot.

We hope you’ve enjoyed this tutorial on how to do the Solomon’s knot crochet stitch, don’t forget if you need any help with your crochet stitches you can always check out our crochet for beginners guide. And if you’re looking to treat yourself, check out our list of the best crochet hooks and the best crochet kits for beginners.