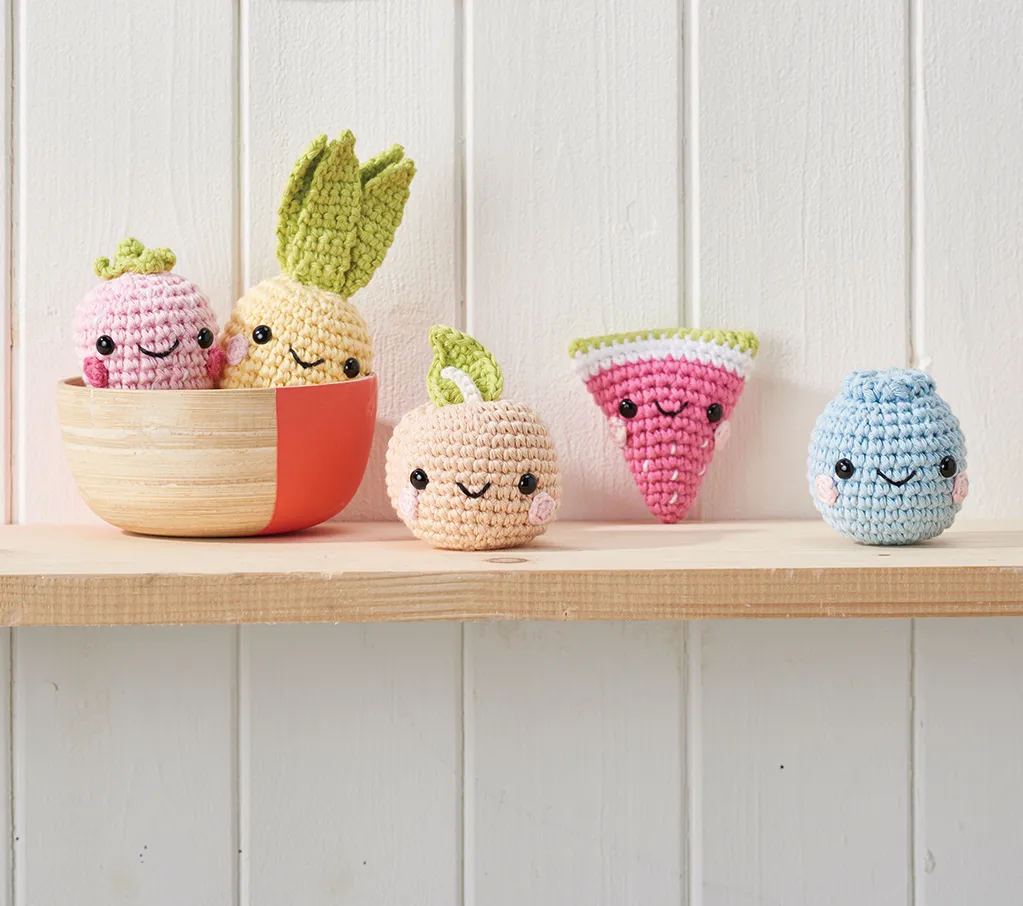
Peach
Step 1
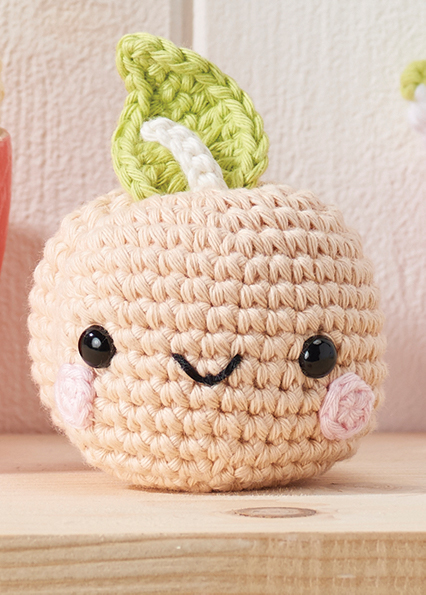
Worked from the top downwards
Round 1 using Yarn A, start with a magic ring, 6dc into ring, pull ring closed [6sts]
Round 2 1dc in each st around [6sts]
Round 3 (inc) 6 times [12sts]
Round 4 (1dc, inc) 6 times [18sts]
Round 5 (2dc, inc) 6 times [24sts]
Round 6 (3dc, inc) 6 times [30sts]
Round 7 (4dc, inc) 6 times [36sts]
Rounds 8-16 1dc in each st around [36sts]
Round 17 (4dc, dec) 6 times [30sts]
Round 18 (3dc, dec) 6 times [24sts]
Attach safety eyes between Rounds 11 and 12.
Start stuffing and continue as you go.
Round 19 (2dc, dec) 6 times [18sts]
Round 20 (1dc, dec) 6 times [12sts]
Round 21 (dec) 6 times [6sts]
Finish with a ss. Sew remaining stitches closed, then leave an extra long tail.
Stalk
Foundation using Yarn F, ch9, turn
Row 1 ss in 2nd chain from the hook, then in each ch across.
Break yarn and fasten off, leaving a long tail for sewing.
Leaf
Foundation using Yarn B, ch9, turn
Row 1 1dc in 2nd ch from hook then in each ch across, turn [8sts]
Row 2 ch1 (does not count as st), 1tr, 2tr in next st, 2tr in next st, 1tr, 1htr, 1dc, 1ss, 1ss, ch2, turn to work down the opposite side, 1ss, 1ss, 1dc, 1htr, 1tr, 2tr in next st, 2tr in next st, 1tr, ss into base
Break yarn and fasten off, leaving a long tail for sewing.
Cheeks (make two)
Round 1 using pale pink 4 ply yarn, start with a magic ring, 6dc into ring, pull ring closed. Ss in the first dc Break yarn and fasten off, leaving a long tail for sewing.
Finishing
Sew on the cheeks using the yarn needle, then embroider on the smile between the eyes, using black embroidery thread, and the main image as a guide.
To make the side indentation, take the long tail and thread it up through the middle of the peach.
Bring the thread down on the outside of the peach, just to the left of the face, then pull until you’re happy with the indentation.
Sew firmly to the base of the peach.
Thread the stalk down through the peach from the top to bottom. Attach and hide the ends, then repeat with the leaf.
Strawberry
Step 1
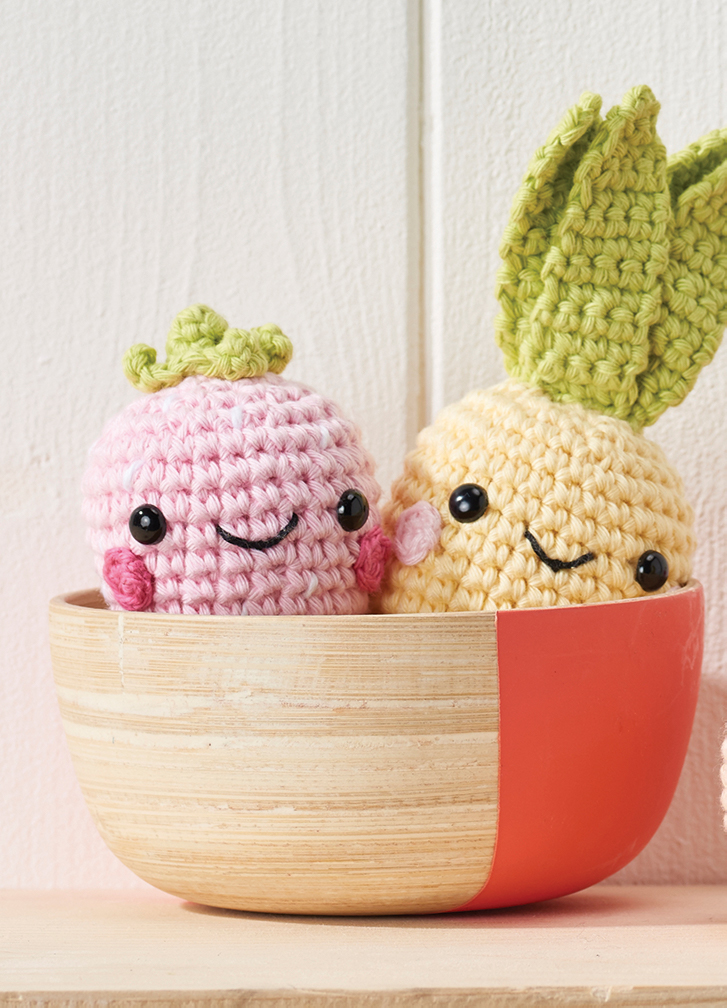
Worked from the bottom upwards
Round 1 using Yarn C, start with a magic ring, 6dc into ring, pull ring closed [6sts]
Round 2 (inc) 6 times [12sts]
Round 3 1dc in each st around [12sts]
Round 4 (1dc, inc) 6 times [18sts]
Round 5 1dc in each st around [18sts]
Round 6 (2dc, inc) 6 times [24sts]
Rounds 7-8 1dc in each st around [24sts]
Round 9 (3dc, inc) 6 times [30sts]
Rounds 10-11 1dc in each st around [30sts]
Round 12 (4dc, inc) 6 times [36sts]
Round 13 1dc in each st around [36sts]
Attach eyes between Rounds 11 and 12. Stuff, continuing as you go.
Round 14 (2dc, dec) 9 times [27sts]
Round 15 (1dc, dec) 9 times [18sts]
Round 16 (1dc, dec) 6 times [12sts]
Round 17 (dec) 6 times [6sts]
Finish with a ss. Sew remaining sts closed and hide the ends.
Stalk
Round 1 using Yarn B, start with a magic ring, 4dc into ring, pull ring closed [4sts]
Round 2 1dc in each st around [4sts]
Round 3 (inc) 4 times [8sts]
Round 4 *ss into the next dc, ch4, ss in 2nd ch from the hook, 1dc in each of next 2ch, ss in next dc; repeat from * another 3 times (forming 4 leaves)
Break yarn and fasten off, leaving a long tail for sewing.
Cheeks (make two)
As for the Peach, but using hot pink 4 ply yarn.
Finishing
Sew on the cheeks using the yarn needle. Using black embroidery thread, and the main image as a guide, embroider on the smile. Sew the stalk to the top of the strawberry, then use 4 ply white yarn to sew on some white seeds.
Blueberry
Step 1
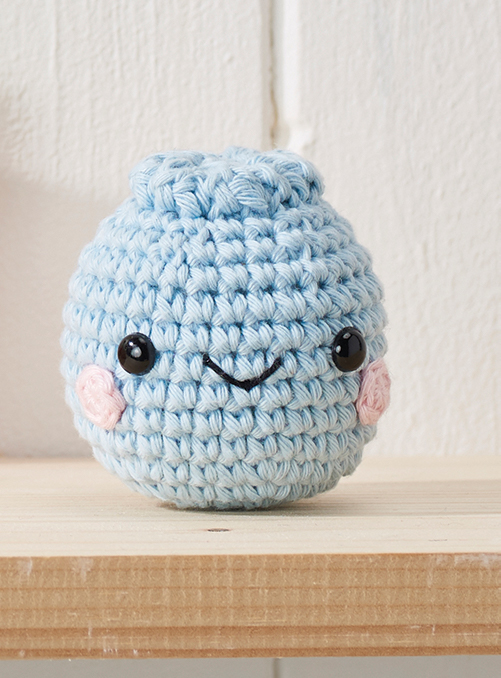
Worked from the bottom upwards
Round 1 using Yarn E, start with a magic ring, 6dc into ring, pull ring closed [6sts]
Round 2 (inc) 6 times [12sts]
Round 3 (1dc, inc) 6 times [18sts]
Round 4 (2dc, inc) 6 times [24sts]
Round 5 (3dc, inc) 6 times [30sts]
Rounds 6-12 1dc in each st around [30sts]
Attach safety eyes between
Rounds 9 and 10, start stuffing, and continue as you go
Round 13 (3dc, dec) 6 times [24sts]
Round 14 (2dc, dec) 6 times [18sts]
Round 15 crochet this round in the back loops only, 1dc in each st around [18sts]
Round 16 (1dc, dec) 6 times [12sts]
Round 17 (dec) 6 times [6sts]
Finish with a ss. Sew remaining sts closed and hide the ends.
Crown
In the front loops of Round 15, attach the yarn with a ss. Ch1, *4 htr, ss; repeat from * to end of round. Finish with a ss in the first ch1. Break yarn, fasten off and leave a long tail. Take the yarn needle and thread through the top of the 4htr clusters, then fasten them down to the top of the blueberry. Continue around. Fasten off and hide tails.
Cheeks (make two)
As for the Peach.
Finishing
Sew on the cheeks using the yarn needle. Using black embroidery thread and the main image as a guide, embroider on the smile.
Watermelon
Step 1
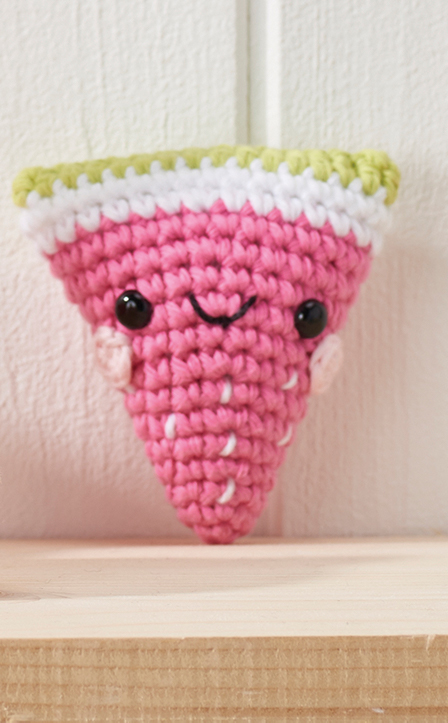
Worked from bottom upwards
Round 1 using Yarn G, start with a magic ring, 4dc into ring, pull ring closed [4sts]
Round 2 (inc) 4 times [8sts]
Round 3 1dc in each st around [8sts]
Round 4 (1dc, inc) 4 times [12sts]
Round 5 1dc in each st around [12sts]
Round 6 (2dc, inc) 4 times [16sts]
Round 7 1dc in each st around [16sts]
Round 8 (3dc, inc) 4 times [20sts]
Round 9 1dc in each st around [20sts]
Round 10 (4dc, inc) 4 times [24sts]
Round 11 1dc in each st around [24sts]
Round 12 (5dc, inc) 4 times [28sts]
Round 13 1dc in each st around [28sts]
Change to Yarn D
Round 14 (6dc, inc) 4 times [32sts]
Round 15 1dc in each st around [32sts]
Change to Yarn B
Round 16 1htr in each st around [32sts]
Attach safety eyes between Rounds 11 and 12, then stuff.
Finish with a ss, leave a long tail, and whip stitch to close.
Cheeks (make two)
As for the Peach.
Finishing
Sew on the cheeks using the yarn needle. Using black embroidery thread and the main image as a guide, embroider on the smile. Using a length of 4 ply white yarn, sew on some white seeds.
Pineapple
Step 1
Worked from the bottom upwards
Round 1 using Yarn F, start with a magic ring, 6dc into ring, pull ring closed [6sts]
Round 2 (inc) 6 times [12sts]
Round 3 (1dc, inc) 6 times [18sts]
Round 4 (2dc, inc) 6 times [24sts]
Round 5 crochet this round in the back loops only, (3dc, inc) 6 times [30sts]
Round 6-14 1dc in each st around [30sts]
Attach safety eyes between Rounds 11 and 12, start stuffing and continue as you go
Round 15 (3dc, dec) 6 times [24sts]
Round 16 (2dc, dec) 6 times [18sts]
Round 17 (1dc, dec) 6 times [12sts]
Round 18 (dec) 6 times [6sts]
Finish with a ss. Sew remaining stitches closed and hide the ends.
Leaves (make four)
Foundation using Yarn B, ch5 (keep a long tail here to attach the leaves later)
Row 1 1dc in 2nd ch from hook then in each ch across, turn [4sts]
Rows 2-12 ch1 (does not count as st), 1dc in each st across, turn [4sts]
Row 13 ch1 (does not count as st), miss 1 st, 1dc in each st across, turn [3sts]
Row 14 ch1 (does not count as st), miss 1 st, 1dc in each st across, turn [2sts]
Row 15 ch1 (does not count as st), miss 1 st, 1dc in each st across [1sts]
Finish with a ss and weave in the top tail.
Cheeks (make two)
As for the Peach.
Finishing
Sew on the cheeks using the yarn needle. Using black embroidery thread and the main image as a guide, embroider on the smile between the eyes. Arrange the four leaves into a cluster at their base, then sew to the top of the pineapple. Fasten off and hide all tails.
