All products were chosen independently by our editorial team. This review contains affiliate links and we may receive a commission for purchases made. Please read our affiliates FAQ page to find out more.

How to bind a quilt – the easy peasy guide to quilt edging

To give your patchwork projects the neatest of finishes, you'll need to learn how to bind a quilt with double-fold quilt binding. We're here to show you all the steps of binding a quilt: watch our binding a quilt video and try our top tips from the pros.

Try 6 issues of Love Patchwork & Quilting magazine for £9.99| SAVE 76%

Published: April 9, 2021 at 3:14 pm

So you've finished piecing your quilt top, and you've basted your quilt sandwich. Go you! Now it's time for the fun bit! Well, they're all fun bits really, but we're especially fond of the finishing stage – binding a quilt. Want to know how to bind a quilt like a pro? This complete guide to quilt edging is for you.

Whether you're brand new to quilt making and aren't sure where to start, or it's been a while and you want a refresher, read on for our easy guide to binding a quilt with mitred corners.

You can bind a quilt in really any fabric from your stash. In this how to guide we'll show you how to cut your chosen binding fabric into strips, then join them together to make the binding for your quilt with what's called double-fold binding. Once you've made your strips we'll talk you through how to use them to bind your quilt with double-fold binding. The ‘double’ fold comes when you attach the binding to your quilt and fold it over and back on itself to seecure all your raw fabric edges within the binding.

Before you start binding a quilt, you'll need to know how to make a quilt sandwich and quilt the layers together – see our guide to quilting for beginners if you're new to this. Then remove any tacking or pins and deal with thread ends by burying them in the batting. You should now have a quilted sandwich with raw edges all around the edge.Press the quilt sandwich and trim the edges so they are even with the quilt top all round. Check the quilt is right-angled. Now you're ready to get binding!

Binding a quilt is also known as quilt edging, but whatever you call it, we're here to help you do it. Don't forget to browse our range of free quilting patterns for inspiration for different quilts to make with your new skills.

Consider the colours and patterns in your quilt and then select a fabric that will enhance or contrast with these. Think of the binding as your quilt’s frame.
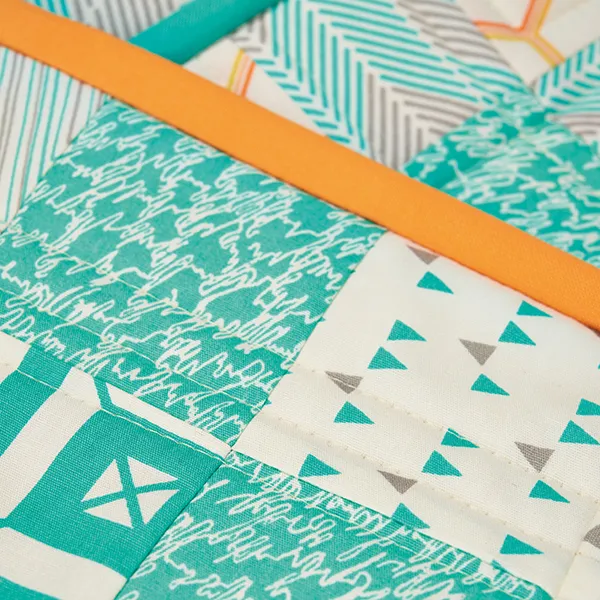
How to bind a quilt step by step guide
Were here to show you how to bind a quilt

How much binding fabric do I need?

Here's how to calculate the amount of fabric you need for your quilt binding.

  1. Measure the quilt all round and then add 20in (50cm) extra – you’ll need the excess!
  2. Divide this number by the width of the fabric (usually 42in), and round up to the nearest whole number.
  3. Multiply this by the width of strips you will cut (normally 2.5in), then divide by 36 to get the yardage required for your quilt.
  4. Most quilts require ½yd to 5⁄8yd for binding, but check your measurements to be sure.

Your binding needs to be strong and hard-wearing, so when you're shopping for binding fabric, opt for a 100% cotton fabric that will survive handling.

What do I need to bind a quilt?

  • Fabric: quilting cotton works well for this – we like to pick a contrasting solid shade to our main quilt top. Shop quilt fabric on Etsy.
  • Rotary cutter and cutting mat – these are optional but will make light work of cutting binding strips. Shop quilt tools at John Lewis
  • Sewing machine: you might like out our favourite sewing machines for quilting.
  • Binding Clips: these are a lot easier to use than pins because they easily clip over the multiple layers used in binding. Buy a pack of 50 on Amazon.
  • Ditch Quilting Foot: For machine-finished binding, this foot will help you achieve a flawless finish by hiding your final seam from the front. Buy it now from John Lewis.
  • Thread: For hand-finishing binding, some invisible thread is a perfect choice, especially if you’re not confident with your stitches. Otherwise, choose a thread that matches the colour of your binding. Stock up with this Gutermann Thread Set (£18.99, Amazon).

How to bind a quilt: video guide

Binding a quilt: step by step guide

This walkthrough is in two stages – firstly we'll show you how to make binding for a quilt, and then how to bind a quilt with it!
You will need:

  • Quilt sandwich
  • Fabric (For the binding strips)
  • Sewing machine
  • Pins (or binding clips)
  • Thread
  • Rotary cutter
  • Cutting matt
  • Iron (for pressing)

How to make binding for a quilt

Binding a quilt by machine: attaching your binding

Step 1

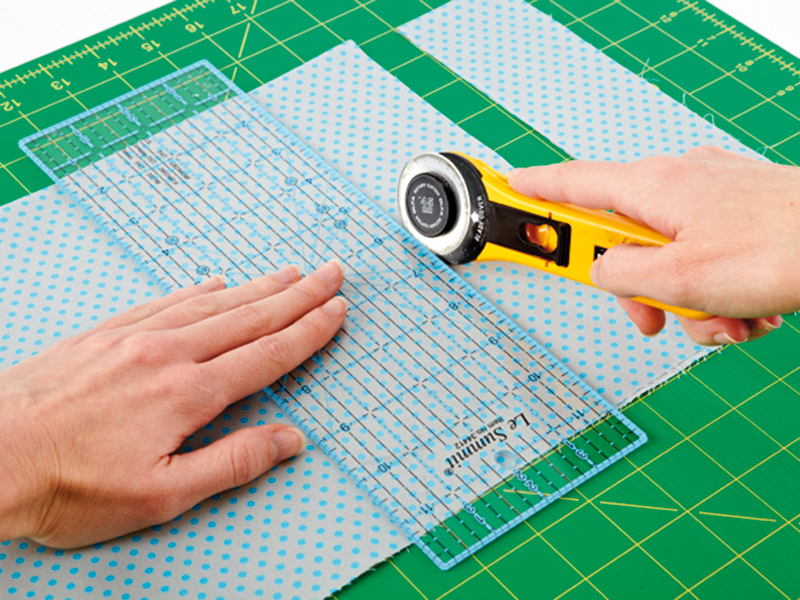
Begin by cutting fabric strips across the width of the fabric to form the basis of your binding. To work out much binding you will need, measure the quilt all round and add about 20in extra. Divide this number by the width of your fabric (normally 42in). This tells you how many strips to cut; round this number up. Cut binding strips 2½in wide.

How to make quilt binding step 1

Step 2

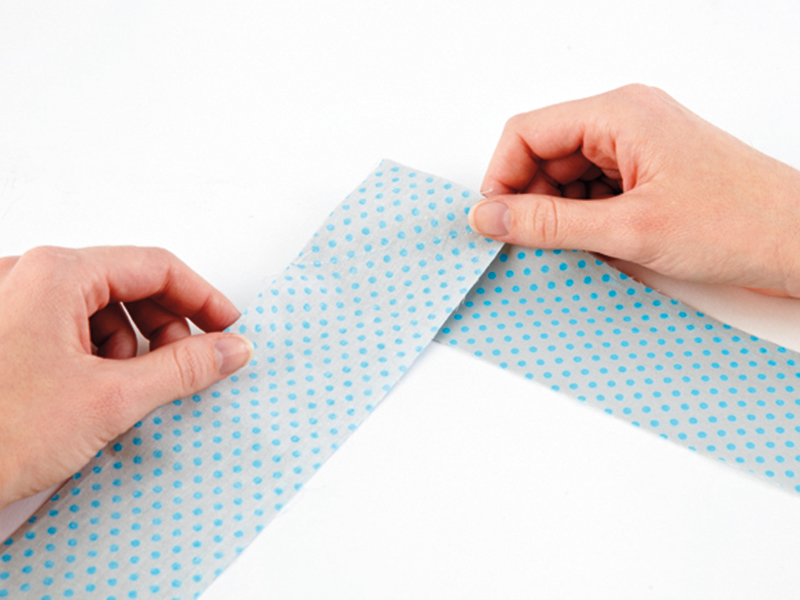
Using ¼inch (6mm) seam allowances, join the strips together to the length required. To do this, place one strip on top of another, at a right angle, so the two short edges match up as below. Draw a diagonal line where the two strips join and sew them together at right angles to create a diagonal join. You can see this step of the process in more detail in our binding a quilt video (above).

How to join binding strips together for quilts

Step 3

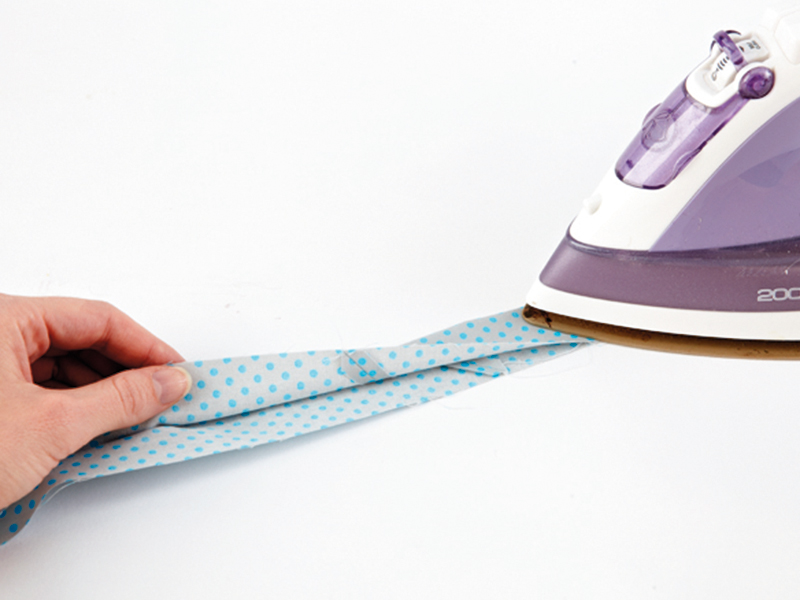
Once you have joined your strips together, press the seams open, then press the binding in half with a hot iron, with wrong sides together. Lay your quilt out on the floor or a large flat surface in front of you and arrange the binding strip around the edges to work out a starting position where the seams won’t fall on any of the 4 corners.

How to make quilt binding strips

How to bind a quilt

Step 1

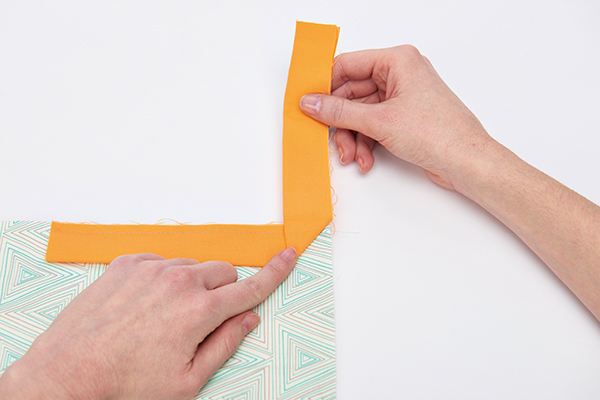
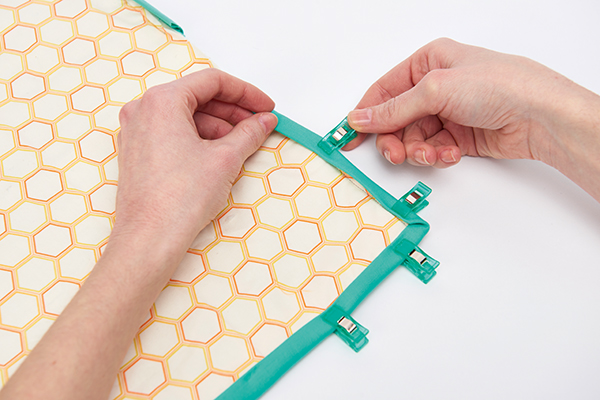
Starting at the centre bottom of your quilt, attach the double-fold binding with raw edges lined up to the raw edges of your quilt sandwich using a 14in seam. End your line of stitching 14in from the first corner of the quilt. Backstitch a few stitches to secure. Remove the quilt from your machine, and fold the binding up, away from the quilt, at a 90-degree angle.

How to bind a quilt double fold binding


Step 2

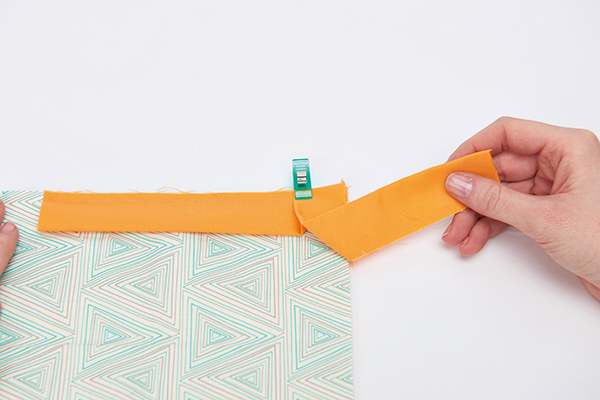
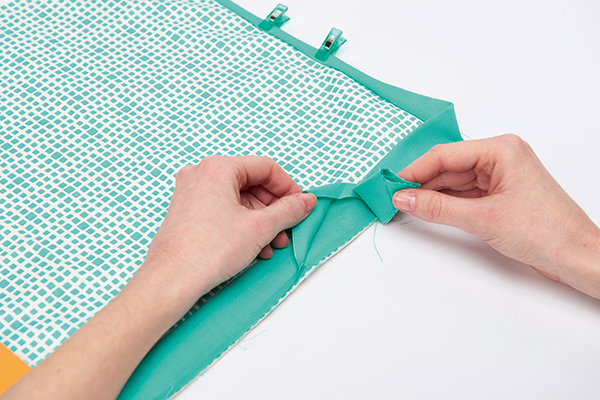
To add mitred corners on quilt binding, use a binding clip to hold the corner, fold the binding back down onto your quilt, aligning the raw edges along the next side. Clip your binding in place along this entire edge. Stitch this edge down, starting and stopping ¼in from each corner, as before. Repeat steps 1-2 until all four corners are mitred, and finish according to your chosen method (see below).

Binding a quilt step 2

Step 3

Set the binding seam by pressing your stitching in place. With the quilt top face up, press the binding away from the quilt, working one edge at a time. Don’t worry about flattening the corners yet. Flip the quilt over and begin pressing the binding to the reverse, extending this fold all the way to the end of the binding along one side. Clip in place.

How to bind a quilt step 3

Step 4

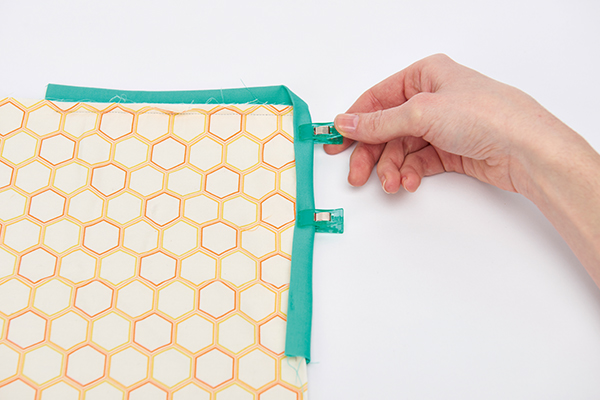
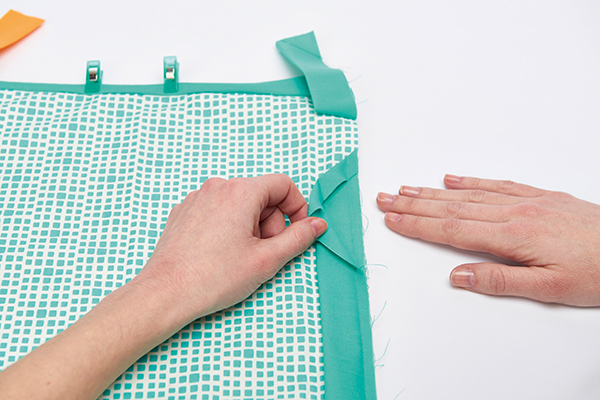
Fold the next edge up over the quilt, completing the mitre at the corner. Work your way around the quilt until all sides are folded and clipped in place. Make sure the folded edge covers the stitched seam on the reverse of your quilt by about 18in.

How to bind a quilt double fold binding step 4

Binding a quilt: Attaching the reverse

Step 1

How to bind a quilt double fold binding step 5

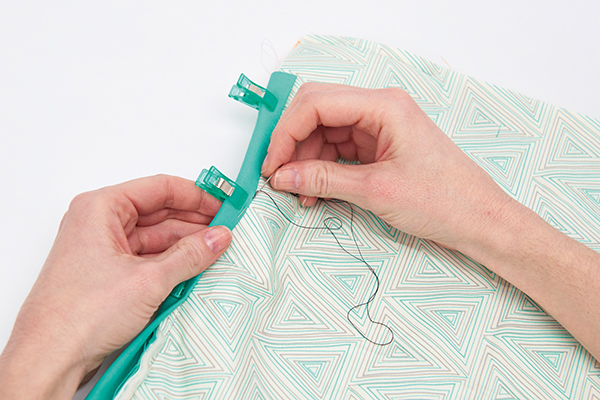
Many people choose to hand finish their binding, stitching the folded edge with invisible stitches to the reverse. We used a contrasting thread here so that you can see the stitches, but if you choose a thread that matches your binding, the stitches will blend right in. Remember to take a few stitches along the folds of your mitred corners to hold these in place.

Step 2

How to bind a quilt with double fold binding step 6

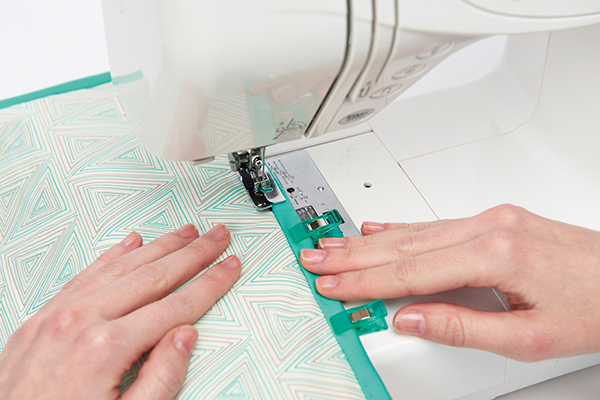
You could also machine stitch to finish, using a ditch quilting foot. With your quilt face up, stitch in the ditch between your quilt and binding. When you reach a corner, put the needle down and pivot before sewing the next side. This will catch down the folded edge of binding on the back, while giving you an invisible line of stitching on the front.

How to put binding on a quilt: joining the ends

Now we’ll show you two ways to start and finish your binding. The traditional method is great for small items, such as mini quilts and coasters, while the seamed method gives you a more uniform finish on longer edges.

Traditional method

How to bind a quilt double fold binding traditional method

To start off, unfold one end of your binding, trim at a 45-degree angle and press under by ½in along the short edge. Align the unfolded raw edge with your quilt and stitch down 3-5in. Refold the binding and continue stitching at the point where you left off.

Howo to bind a quilt with double fold binding traditional method

To finish off, trim the end of the binding so it overlaps the beginning folded edge by about 1in. Tuck this end into the folded binding at the start and pin in place. Finish stitching past the raw edge, making sure you sew down both the start and end of the binding.

Seamed method

Quilt edging tutorial

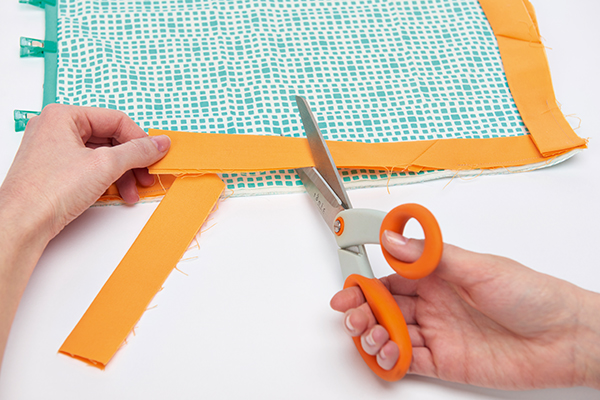
Start sewing your binding leaving an unsewn 8in tail. Continue around the quilt, stopping 8in before the start of the binding. Lay one end of binding along the edge of the quilt. Trim the strip at about the halfway point of the unstitched edge, cutting the strip straight.

How to bind a quilt double fold binding seamed

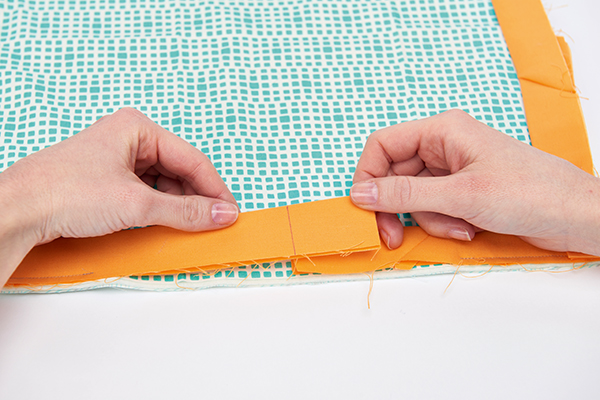
Lay the remaining end of binding over the top, and mark where the strips meet. Measure the width of the unfolded binding strip, add this to the length, and trim the strip at this point. So if you are using a 2½in strip, the two binding ends should overlap by 2½in.

Unfold the two ends and place right sides together, so the pieces are at right angles to one another. Draw a 45-degree diagonal line across one end and sew along the drawn line. Trim the seam to ¼in and finger press open. Refold your binding and finish attaching to the quilt.

Now try out your new skills

Got the hang of DIY quilt edging with this guide? Now try out our simple placemat and coaster tutorial to have a play around with the binding methods in this post! Or why not try our really easy Half rectangle triangles quilt pattern?

5 top tips for binding a quilt

  1. Use up your stash: Binding is a great way to use up scraps. If you’re making multi-coloured scrap binding, help it to stand out from your main quilt top design by using darker or contrasting tones of fabrics than those of your main quilt fabrics. Audition the fabrics you think you want to use by laying out scraps together on top of your quilt before you start piecing.
  2. Save time and strip-piece: sewing up scrappy multi-coloured binding? speed up your piecing with strip-piecing – here’s how to do strip piecing if you haven’t done it before.
  3. One quilt, two sides: If your quilt back is a distinctly different colour to the front, why not try 2-colour binding? It’s basically reversible so you’ll see one colour on the front and one on the back.
  4. Neaten up your corners: Avoid your binding seams occurring at the corners of your quilt to reduce bulk and make neater mitred corners. A good way to do this is do a dummy run and place your binding around the quilt perimeter to see where the seams will fall before you start to stitch
  5. Give it a seasonal twist: Give Christmas quilts a delightful finishing touch by strip-piecing candy cane effects with two tones – one lighter and darker (red and white looks especially festive)