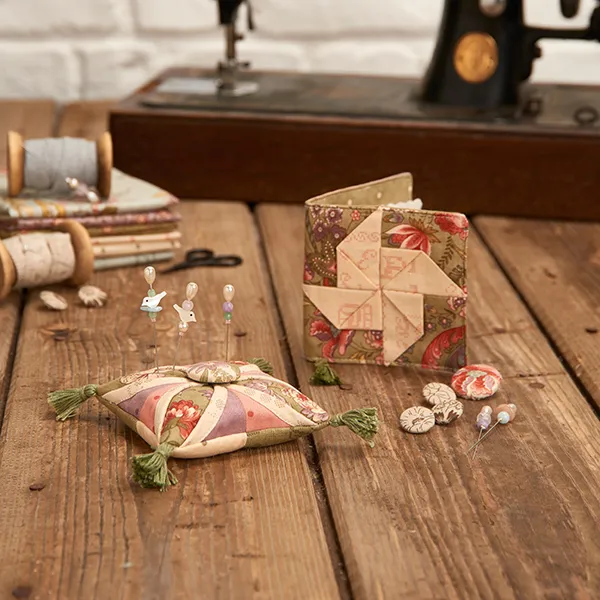
How to make the pin cushion
Step 1
Cut each of the pink and purple 2½in squares in half along the diagonal to yield two (2) HSTs from each square.
Step 2
From each of the green backing fabrics cut two (2) 2½in squares.
Step 3
Cut the batting in half to yield two (2) 2¼in x 5in pieces.
Making the Cathedral Window
Step 1
Take your 10in square and with wrong side up, fold a ½in seam over on each edge (Fig 1). Open up and fold in the corners (Fig 2A). Refold the edges to mitre the corners and press well (Fig 2B).

Step 2
Fold the piece in half to mark vertical and horizontal creases. Open up (Fig 3).

Step 3
Fold each corner in to meet the centre (Fig 4). Press well.

Step 4
Repeat step 6 above to fold the new corners in to the centre again and press again.
Step 5
Open up your last four ‘doors’ and insert your green 4 ½in square (Fig 5A). Reclose the doors over the top and pin in place (Fig 5B).

Step 6
Sew a few stitches over the points to hold these closed at the centre (Fig 6). These stitches will be hidden by your button later so they don’t need to be too neat.
Step 7
Stitch together one (1) pink and one (1) purple HST along the short edges to make a large triangle (Fig 7). Repeat to make four (4).

Step 8
Place each of the four (4) triangle units on top of each flap (Fig 8). Hold the triangles in place with a pin or basting stitch.
Step 9
Roll back the edge of each flap over the top of the pieced triangle, to reveal the green fabric underneath (Fig 9A & Fig 9B). These have bias edges so don’t be afraid to stretch them into a nice curve. Pin in place.

Step 10
Stitch along each curve as close to the edge as you can. Remove pins as you go. Trim away any overhang and press the block well before moving on.
Assembling the pin cushion
Step 1
Sew two (2) 2½in green background squares together. Repeat to make two (2) pieced rectangles.
Step 2
Place these halves together matching the centre seams. Stitch a ¼in seam approximately 1in long from each edge, leaving a gap in the centre for turning through later (Fig 10).
Step 3
Optional – make some tassels with embroidery floss. Take a fork and wrap the floss around the tines 20-30 times. Cut a 5in length of floss and wrap this around your looped thread between the first and second tines. Pull taut and knot several times to secure. Slide the tassel off the fork and cut along the bottom loop to create individual strands. Loop some more floss through the top of the tassel for attaching.
Step 4
Place the pincushion front right side up, placing the tassels in each corner so that the top loop is aligned with the raw edge making sure they won’t get caught in the seam (Fig 11). Place the pincushion back on top, right side down. Finally place the two pieces of batting on top aligned with the raw edges. Pin the layers in place.
Step 5
Stitch a ¼in seam all around the edge of your sandwich (Fig 12). Backstitch at the end to secure.
Step 6
Clip the corners and turn the pincushion right side out through the hole.
Step 7
Stuff the pincushion until it is nice and firm. Turn under the seam allowance on the back and hand stitch it closed with ladder stitch.
Step 8
Using your thumb and finger, make a divot in the centre of the pincushion. With a long needle and doubled-up thread, stitch a few stitches front to back, right through the centre of the pincushion to draw the centres together. Attach the button to the centre of the front to finish.