All products were chosen independently by our editorial team. This review contains affiliate links and we may receive a commission for purchases made. Please read our affiliates FAQ page to find out more.
Make reversible fabric with double knitting
Create warm, bouncy and completely reversible fabric by using the double knitting method. Jen Arnall-Culliford shows you how it’s done.
Double knitting is, rather confusingly, the name of a nifty knitting technique, as well as a yarn weight description. This article is all about the knitting technique (find out about double knitting yarn here).
Double knitting can be used for two main purposes – the creation of a tube of knitting on straight knitting needles, or for making a reversible colourwork fabric.
This article will focus on the latter application, covering casting on and off, as well as how to work the basic fabric.
What is double knitting?
Double knitting fabric is essentially 1x1 rib where you are using different yarns for the knits and the purls.
In order to maintain a stocking stitch fabric on both sides of the work, it’s necessary to work all knit stitches with both yarns held at the back, and all purl stitches with both yarns held at the front.
You will likely find this easiest if you hold your yarns in a similar way to how you would for a Fair Isle knitting project.
I prefer to hold both yarns over my right index finger (I work Fair Isle with yarns over my right index and middle fingers). I find it slightly easier to move both yarns to front and back if they are over the same finger.
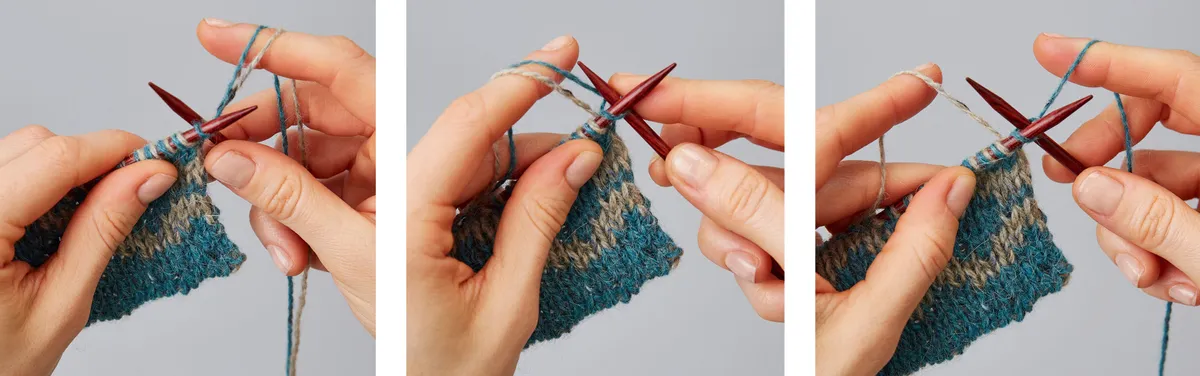
1. Holding both strands of yarn over the right index finger; 2. Holding both strands of yarn over the left index finger; 3. Two-handed method of holding the two yarns.
Double knitting cast on
There are different ways to cast on for double knitting depending on whether you want the bottom edge to be closed or open.
If you require an open bottom edge, then the two-colour backwards-loop cast-on method is ideal.
For a closed bottom edge, simply cast on half of the required stitches, and knit into the front and back of every stitch on the first row.
We'll explain both methods below.
You will need to cast on sufficient stitches for both the front and back of the fabric, e.g. if you want a piece that is 20 sts wide, then you need to cast on a total of 40 sts (20 sts for front and the same for the back).
Two-colour backwards-loop cast-on
Step 1
Tie the two yarns together in a slip knot and place on your needle. Hold the yarns over your thumb and index finger of your left hand.
Step 2
Make a backwards loop with the yarn over your thumb.
Step 3
Insert the needle tip into this loop from bottom to top, and slip the loop off your thumb.
Step 4
Gently tighten the loop on the needle.
Step 5
Make a backwards loop with the yarn over your index finger.
Step 6
Insert the needle top into this loop from bottom to top, and slip the loop off your thumb.
Step 7
Gently tighten the loop on the needle.
Step 8
Repeat steps 2-7 until you have the required number of stitches.
Knit into front and back of every stitch
Step 1
A straightforward way to cast on a closed bottom edge for double knitting is to simply cast on half of the required stitches, and knit into front and back of every stitch on the first row.
If you need to work in two colours from the start, then set up the knitting as follows:
Cast on half the number of stitches that you require using one colour and your usual cast-on method.
Step 2
Knit into the front of the first stitch with yarn A, but don’t slip the stitch off the left-hand needle.
Step 3
Knit into the back of the same stitch using yarn B, and slip the stitch off the needle.
Step 4
Repeat steps 2 and 3 until you reach the end of the row.
Another technique to try is the two-colour Italian cast-on method demonstrated in The Knitter’s Brioche Knitting Masterclass in issue 104.
This technique produces a beautifully neat, closed bottom edge, whilst also setting up alternate colours ready for the two sides of the fabric. It's perfect if you're working a reversible piece with two colours.
Double knitting patterns
There are a number of ways of charting colourwork for double knitting fabric. The simplest of these is used for projects where the front and back of the fabric have the same pattern, with the colours reversed.
In this situation, the pattern is usually charted by showing one side of the fabric. Each square of the chart then represents two stitches, rather than one stitch as is more common.
It is easier to work in the round from a chart for double knitting than to work flat (as you will see in a moment).
Double knitting in the round
The colourwork pattern shown on Chart A below has a 6-stitch repeat, and a swatch has been cast on with the two-colour knit front and back method.
It has been joined to work in the round, and is ready to work row 12 from the chart.
The first 3 squares on the chart are all coloured blue for yarn A, so this means that you work as follows:
*K1 in yarn A (with both yarns at the back of the work), then P1 in yarn B (with both yarns at the front of the work); rep from * twice more.
K1 in yarn A (with both yarns at the back of the work). P1 in yarn B (with both yarns at the front of the work).
The next 3 squares on the chart are all coloured grey for yarn B, so this means that in the same way you’ll work *K1 in yarn B (with both yarns at the back of the work), then P1 in yarn A (with both yarns at the front of the work); rep from * twice more.
Continue to work from the chart in this way until you reach the end of the round.
When working in the round, all rounds are worked with the ‘RS’ facing you, so the chart always shows you what shade to use for the knit stitches (and the other yarn is then used for the purl stitches).
Double knitting worked flat
It is slightly more tricky to create a flat fabric in double knitting.
As the fabric is reversible, there isn’t really a right side or a wrong side, but we will use RS to mean the side that is shown on the chart, with the WS being the reverse colourway.
The first issue is that you need to twist the yarns together at the start of the new row, so that the fabric remains joined at the edges.
This is actually easier than it sounds – simply take the new yarn for the first stitch of the new row from underneath the other yarn before knitting the first stitch:
Twist the yarns together at the start of the row. This prevents a gap from forming at the edge of the work.
This is the same way that you would twist yarns when working intarsia, and it ensures that you don’t get a gap in your fabric.
The RS row of the pattern is then worked in exactly the same way as described above for working in the round.
It then requires a bit of mental gymnastics to work the WS row from the chart…
First, you are reading the chart from left to right (as is normal for WS rows). And second, the first three squares on row 12 are shown as blue yarn A, which on the WS means to use grey yarn B to knit and then to use blue yarn A to purl.
As before, you need to move both yarns from back to front as you go from knit to purl.
I found it tricky to be looking at the opposite side of the fabric and to have to reverse things in my head, so as with many things in knitting, the secret was to take my time and re-read the key slowly before working across each row.
I normally find it fairly easy to read my knitting, so I know whether my pattern is lined up as I work the row.
When double knitting back and forth, it’s trickier than normal to see how things are lined up, since you’ve got both yarns being used for each visible knit stitch on the front of the fabric (one is being used for the purl on the reverse).
Once you’ve worked enough fabric, though, it becomes easier as you start to see how things are meant to line up.
It’s worth persevering, as the finished fabric will be warm, bouncy and perfectly reversible!
Complex double knitting fabrics
Some patterns use double knitting to create a reversible fabric where the two sides have different patterns.
These require a more complex charting method, since the knit and purl stitches in each pair may now be using the same shade rather than always alternating.
In order to make this fabric, each row must be worked twice. On the first pass the yarn A is worked across all stitches indicated, with the remaining stitches slipped.
And on the second pass, the yarn B is worked across the stitches that were slipped on the previous pass, with the yarn A stitches slipped.
There is an excellent explanation and complete tutorial in Lynne Barr’s book, Reversible Knitting (Stewart Tabori & Chang, 2009). It not only includes several complex double knitting charted stitch patterns, but also designs using this technique.
Double knitting cast off
To give your double knitting a cast-off edge that looks almost invisible, you can use the Kitchener stitch cast-off method. This creates a lovely rounded edge to your work.
For a simpler method, work as follows, using the main colour throughout:
1. SSK.
2. SSK and pass the first st over the second st in order to cast it off.
Repeat step 2 until all sts are used up. Break yarn and fasten off through final st.
When working in the round, the cast-off edge may also be worked as follows:
1. Knit 1.
2. K2tog.
3. Pass the first st over the second to cast it off.
Repeat steps 2 and 3 until 1 st remains. K1 and pass it over the last K2tog stitch to cast it off.
Use the tail of the yarn to neaten the join at the end of the round.
Discover double knitting
It can take a bit of practice to master advanced techniques such as double knitting, but like so many things it’s easy when you know how.
Try working small swatches until you feel comfortable with the techniques, then you’ll be ready to take on a bigger project.
The ‘Spots Cowl’ by Hilary Smith Callis pictured at the top of this page appears in her e-book Double Knit Three – why not give it a go as your first project?
Try more colourwork with Gathered
If you like double knitting then you might also enjoy intarsia knitting, a fun way to create colourwork pictures in your knits. Learn how it’s done today!
Technical editor Jen has worked with a wide range of designers, from Susan Crawford and Kate Davies to Fyberspates, helping them to produce perfect patterns. She’s also a knitting designer in her own right, and has an in-depth knowledge of knitting techniques
This website is owned and published by Our Media Ltd. www.ourmedia.co.uk